`](https://react.dev/reference/react/Suspense) boundary. The suspense fallback can be used to show a loading indicator and will be shown while the screen component is being loaded.
## Web-specific behavior
Some of the navigators have different behavior on the web compared to native platforms:
1. [**Native Stack Navigator**](native-stack-navigator.md)
Native Stack Navigator uses the platform's primitives to handle animations and gestures on native platforms.
On the Web, animations and gestures are not supported.
2. [**Stack Navigator**](stack-navigator.md)
Stack Navigator uses [`react-native-gesture-handler`](https://docs.swmansion.com/react-native-gesture-handler/) to handle swipe gestures on native platforms.
Screen transition animations are disabled by default on the web. You can enable them by using the [`animation`](stack-navigator.md#animations) option. Gestures are not supported on the web.
3. [**Drawer Navigator**](drawer-navigator.md)
Drawer Navigator uses [`react-native-gesture-handler`](https://docs.swmansion.com/react-native-gesture-handler/) to handle swipe gestures and [`react-native-reanimated`](https://docs.swmansion.com/react-native-reanimated/) for animations on native platforms.
On the Web, the animations are handled using CSS transitions instead, and gestures are not supported.
In addition, navigators render hyperlinks on the web when possible, such as in the drawer sidebar, tab bar, stack navigator's back button, etc. to provide the expected behavior on the web.
Since `react-native-gesture-handler` and `react-native-reanimated` are not used on the web, avoid importing them in your own code to reduce the bundle size unless you need them for your components. You can use `.native.js` or `.native.ts` extensions for code specific to native platforms.
## Configuring hosting providers
React Navigation is designed for Single Page Applications (SPAs). This usually means that the `index.html` file needs to be served for all routes.
During development, the bundler such as Webpack or Metro automatically handles this. However, when deploying the site, you may need to configure redirects to ensure that the `index.html` file is served for all routes to avoid 404 errors.
Here are instructions for some of the popular hosting providers:
### Netlify
To handle redirects on Netlify, add the following in the `netlify.toml` file at the root of your project:
```toml
[[redirects]]
from = "/*"
to = "/index.html"
status = 200
```
### Vercel
To handle redirects on Vercel, add the following in the `vercel.json` file at the root of your project:
```json
{
"rewrites": [{ "source": "/(.*)", "destination": "/index.html" }]
}
```
### GitHub Pages
GitHub Pages doesn't support such redirection configuration for SPAs. There are a couple of ways to work around this:
- Rename your `index.html` to `404.html`. This will serve the `404.html` file for all routes. However, this will cause a 404 status code to be returned for all routes. So it's not ideal for SEO.
- Write a script that copies the `index.html` file to all routes in the build output. For example, if your app has routes `/`, `/about`, and `/contact`, you can copy the `index.html` file to `about.html` and `contact.html`.
---
# Authentication flows
Source: https://react-navigation-docs.netlify.app/docs/auth-flow.md
Most apps require that a user authenticates in some way to have access to data associated with a user or other private content. Typically the flow will look like this:
- The user opens the app.
- The app loads some authentication state from encrypted persistent storage (for example, [`SecureStore`](https://docs.expo.io/versions/latest/sdk/securestore/)).
- When the state has loaded, the user is presented with either authentication screens or the main app, depending on whether valid authentication state was loaded.
- When the user signs out, we clear the authentication state and send them back to authentication screens.
> **Note:**
>
> We say "authentication screens" because usually there is more than one. You may have a main screen with a username and password field, another for "forgot password", and another set for sign up.
## What we need
We want the following behavior from our authentication flow:
- When the user is signed in, we want to show the main app screens and not the authentication-related screens.
- When the user is signed out, we want to show the authentication screens and not the main app screens.
- After the user goes through the authentication flow and signs in, we want to unmount all of the screens related to authentication, and when we press the hardware back button, we expect to not be able to go back to the authentication flow.
## How it will work
We can configure different screens to be available based on some condition. For example, if the user is signed in, we want `Home` to be available. If the user is not signed in, we want `SignIn` to be available.
**Static:**
```js
const useIsSignedIn = () => {
return true;
};
const useIsSignedOut = () => {
return !useIsSignedIn();
};
// codeblock-focus-start
const RootStack = createNativeStackNavigator({
screens: {
Home: {
if: useIsSignedIn,
screen: HomeScreen,
},
SignIn: {
if: useIsSignedOut,
screen: SignInScreen,
},
},
});
// codeblock-focus-end
const Navigation = createStaticNavigation(RootStack);
export default function App() {
return ;
}
function HomeScreen() {
return ;
}
function SignInScreen() {
return ;
}
```
Here, for each screen, we have defined a condition using the `if` property which takes a hook. The hook returns a boolean value indicating whether the user is signed in or not. If the hook returns `true`, the screen will be available, otherwise it won't.
This means:
- When `useIsSignedIn` returns `true`, React Navigation will only use the `Home` screen, since it's the only screen matching the condition.
- Similarly, when `useIsSignedOut` returns `true`, React Navigation will use the `SignIn` screen.
This makes it impossible to navigate to the `Home` when the user is not signed in, and to `SignIn` when the user is signed in.
When the values returned by `useIsSignedIn` and `useIsSignedOut` change, the screens matching the condition will change:
- Let's say, initially `useIsSignedOut` returns `true`. This means that the `SignIn` screen is shown.
- After the user signs in, the return value of `useIsSignedIn` will change to `true` and `useIsSignedOut` will change to `false`, which means:
- React Navigation will see that the `SignIn` screen no longer matches the condition, so it will remove the screen.
- Then it'll show the `Home` screen automatically because that's the first screen available when `useIsSignedIn` returns `true`.
The order of the screens matters when there are multiple screens matching the condition. For example, if there are two screens matching `useIsSignedIn`, the first screen will be shown when the condition is `true`.
## Define the hooks
To implement the `useIsSignedIn` and `useIsSignedOut` hooks, we can start by creating a context to store the authentication state. Let's call it `SignInContext`:
```js
const SignInContext = React.createContext();
```
Then we can implement the `useIsSignedIn` and `useIsSignedOut` hooks as follows:
```js
function useIsSignedIn() {
const isSignedIn = React.useContext(SignInContext);
return isSignedIn;
}
function useIsSignedOut() {
return !useIsSignedIn();
}
```
We'll discuss how to provide the context value later.
**Dynamic:**
```js
const Stack = createNativeStackNavigator();
export default function App() {
const isSignedIn = true;
return (
// codeblock-focus-start
{isSignedIn ? (
) : (
)}
// codeblock-focus-end
);
}
function HomeScreen() {
return ;
}
function SignInScreen() {
return ;
}
```
Here, we have conditionally defined the screens based on the value of `isSignedIn`.
This means:
- When `isSignedIn` is `true`, React Navigation will only see the `Home` screen, since it's the only screen defined based on the condition.
- Similarly, when `isSignedIn` is `false`, React Navigation will only see the `SignIn` screen.
This makes it impossible to navigate to the `Home` when the user is not signed in, and to `SignIn` when the user is signed in.
When the value of `isSignedIn` changes, the screens defined based on the condition will change:
- Let's say, initially `isSignedIn` is `false`. This means that the `SignIn` screen is shown.
- After the user signs in, the value of `isSignedIn` will change to `true`, which means:
- React Navigation will see that the `SignIn` screen is no longer defined, so it will remove the screen.
- Then it'll show the `Home` screen automatically because that's the first screen defined when `isSignedIn` returns `true`.
The order of the screens matters when there are multiple screens matching the condition. For example, if there are two screens defined based on `isSignedIn`, the first screen will be shown when the condition is `true`.
## Add more screens
For our case, let's say we have 3 screens:
- `SplashScreen` - This will show a splash or loading screen when we're restoring the token.
- `SignIn` - This is the screen we show if the user isn't signed in already (we couldn't find a token).
- `Home` - This is the screen we show if the user is already signed in.
So our navigator will look like:
**Static:**
```js
const RootStack = createNativeStackNavigator({
screens: {
Home: {
if: useIsSignedIn,
screen: HomeScreen,
},
SignIn: {
if: useIsSignedOut,
screen: SignInScreen,
options: {
title: 'Sign in',
},
},
},
});
const Navigation = createStaticNavigation(RootStack);
```
**Dynamic:**
```js
const Stack = createNativeStackNavigator();
export default function App() {
const isSignedIn = true;
return (
{isSignedIn ? (
) : (
)}
);
}
```
Notice how we have only defined the `Home` and `SignIn` screens here, and not the `SplashScreen`. The `SplashScreen` should be rendered before we render any navigators so that we don't render incorrect screens before we know whether the user is signed in or not.
When we use this in our component, it'd look something like this:
**Static:**
```js
if (isLoading) {
// We haven't finished checking for the token yet
return ;
}
const isSignedIn = userToken != null;
return (
);
```
**Dynamic:**
```js
if (isLoading) {
// We haven't finished checking for the token yet
return ;
}
const isSignedIn = userToken != null;
return (
{isSignedIn ? (
) : (
)}
);
```
In the above snippet, `isLoading` means that we're still checking if we have a token. This can usually be done by checking if we have a token in `SecureStore` and validating the token.
Next, we're exposing the sign in status via the `SignInContext` so that it's available to the `useIsSignedIn` and `useIsSignedOut` hooks.
In the above example, we have one screen for each case. But you could also define multiple screens. For example, you probably want to define password reset, signup, etc screens as well when the user isn't signed in. Similarly for the screens accessible after sign in, you probably have more than one screen.
**Static:**
We can use [`groups`](static-configuration.md#groups) to define multiple screens:
```js
const RootStack = createNativeStackNavigator({
screens: {
// Common screens
},
groups: {
SignedIn: {
if: useIsSignedIn,
screens: {
Home: HomeScreen,
Profile: ProfileScreen,
},
},
SignedOut: {
if: useIsSignedOut,
screens: {
SignIn: SignInScreen,
SignUp: SignUpScreen,
ResetPassword: ResetPasswordScreen,
},
},
},
});
```
**Dynamic:**
We can use [`React.Fragment`](https://react.dev/reference/react/Fragment) or [`Group`](group.md) to define multiple screens:
```js
isSignedIn ? (
<>
) : (
<>
);
```
> **Tip:**
>
> Instead of having your login-related screens and rest of the screens in two different Stack navigators and render them conditionally, we recommend to use a single Stack navigator and place the conditional inside. This makes it possible to have a proper transition animation during login/logout.
## Implement the logic for restoring the token
> **Note:**
>
> The following is just an example of how you might implement the logic for authentication in your app. You don't need to follow it as is.
From the previous snippet, we can see that we need 3 state variables:
- `isLoading` - We set this to `true` when we're trying to check if we already have a token saved in `SecureStore`.
- `isSignout` - We set this to `true` when user is signing out, otherwise set it to `false`. This can be used to customize the animation when signing out.
- `userToken` - The token for the user. If it's non-null, we assume the user is logged in, otherwise not.
So we need to:
- Add some logic for restoring token, signing in and signing out
- Expose methods for signing in and signing out to other components
We'll use `React.useReducer` and `React.useContext` in this guide. But if you're using a state management library such as Redux or Mobx, you can use them for this functionality instead. In fact, in bigger apps, a global state management library is more suitable for storing authentication tokens. You can adapt the same approach to your state management library.
First we'll need to create a context for auth where we can expose the necessary methods:
```js
const AuthContext = React.createContext();
```
In our component, we will:
- Store the token and loading state in `useReducer`
- Persist it to `SecureStore` and read it from there on app launch
- Expose the methods for sign in and sign out to child components using `AuthContext`
So our component will look like this:
**Static:**
```js dependencies=expo-secure-store
// codeblock-focus-start
// codeblock-focus-end
const AuthContext = React.createContext();
const SignInContext = React.createContext();
function useIsSignedIn() {
const isSignedIn = React.useContext(SignInContext);
return isSignedIn;
}
function useIsSignedOut() {
return !useIsSignedIn();
}
function SplashScreen() {
return (
Loading...
);
}
function HomeScreen() {
const { signOut } = React.useContext(AuthContext);
return (
Signed in!
);
}
function SignInScreen() {
const [username, setUsername] = React.useState('');
const [password, setPassword] = React.useState('');
const { signIn } = React.useContext(AuthContext);
return (
);
}
// codeblock-focus-start
export default function App() {
const [state, dispatch] = React.useReducer(
(prevState, action) => {
switch (action.type) {
case 'RESTORE_TOKEN':
return {
...prevState,
userToken: action.token,
isLoading: false,
};
case 'SIGN_IN':
return {
...prevState,
isSignout: false,
userToken: action.token,
};
case 'SIGN_OUT':
return {
...prevState,
isSignout: true,
userToken: null,
};
}
},
{
isLoading: true,
isSignout: false,
userToken: null,
}
);
React.useEffect(() => {
// Fetch the token from storage then navigate to our appropriate place
const bootstrapAsync = async () => {
let userToken;
try {
// Restore token stored in `SecureStore` or any other encrypted storage
userToken = await SecureStore.getItemAsync('userToken');
} catch (e) {
// Restoring token failed
}
// After restoring token, we may need to validate it in production apps
// This will switch to the App screen or Auth screen and this loading
// screen will be unmounted and thrown away.
dispatch({ type: 'RESTORE_TOKEN', token: userToken });
};
bootstrapAsync();
}, []);
const authContext = React.useMemo(
() => ({
signIn: async (data) => {
// In a production app, we need to send some data (usually username, password) to server and get a token
// We will also need to handle errors if sign in failed
// After getting token, we need to persist the token using `SecureStore` or any other encrypted storage
// In the example, we'll use a dummy token
dispatch({ type: 'SIGN_IN', token: 'dummy-auth-token' });
},
signOut: () => dispatch({ type: 'SIGN_OUT' }),
signUp: async (data) => {
// In a production app, we need to send user data to server and get a token
// We will also need to handle errors if sign up failed
// After getting token, we need to persist the token using `SecureStore` or any other encrypted storage
// In the example, we'll use a dummy token
dispatch({ type: 'SIGN_IN', token: 'dummy-auth-token' });
},
}),
[]
);
if (state.isLoading) {
// We haven't finished checking for the token yet
return ;
}
const isSignedIn = state.userToken != null;
return (
);
}
const RootStack = createNativeStackNavigator({
screens: {
Home: {
if: useIsSignedIn,
screen: HomeScreen,
},
SignIn: {
if: useIsSignedOut,
screen: SignInScreen,
options: {
title: 'Sign in',
},
},
},
});
const Navigation = createStaticNavigation(RootStack);
// codeblock-focus-end
```
**Dynamic:**
```js dependencies=expo-secure-store
// codeblock-focus-start
// codeblock-focus-end
const AuthContext = React.createContext();
function SplashScreen() {
return (
Loading...
);
}
function HomeScreen() {
const { signOut } = React.useContext(AuthContext);
return (
Signed in!
);
}
function SignInScreen() {
const [username, setUsername] = React.useState('');
const [password, setPassword] = React.useState('');
const { signIn } = React.useContext(AuthContext);
return (
);
}
const Stack = createNativeStackNavigator();
// codeblock-focus-start
export default function App() {
const [state, dispatch] = React.useReducer(
(prevState, action) => {
switch (action.type) {
case 'RESTORE_TOKEN':
return {
...prevState,
userToken: action.token,
isLoading: false,
};
case 'SIGN_IN':
return {
...prevState,
isSignout: false,
userToken: action.token,
};
case 'SIGN_OUT':
return {
...prevState,
isSignout: true,
userToken: null,
};
}
},
{
isLoading: true,
isSignout: false,
userToken: null,
}
);
React.useEffect(() => {
// Fetch the token from storage then navigate to our appropriate place
const bootstrapAsync = async () => {
let userToken;
try {
// Restore token stored in `SecureStore` or any other encrypted storage
userToken = await SecureStore.getItemAsync('userToken');
} catch (e) {
// Restoring token failed
}
// After restoring token, we may need to validate it in production apps
// This will switch to the App screen or Auth screen and this loading
// screen will be unmounted and thrown away.
dispatch({ type: 'RESTORE_TOKEN', token: userToken });
};
bootstrapAsync();
}, []);
const authContext = React.useMemo(
() => ({
signIn: async (data) => {
// In a production app, we need to send some data (usually username, password) to server and get a token
// We will also need to handle errors if sign in failed
// After getting token, we need to persist the token using `SecureStore` or any other encrypted storage
// In the example, we'll use a dummy token
dispatch({ type: 'SIGN_IN', token: 'dummy-auth-token' });
},
signOut: () => dispatch({ type: 'SIGN_OUT' }),
signUp: async (data) => {
// In a production app, we need to send user data to server and get a token
// We will also need to handle errors if sign up failed
// After getting token, we need to persist the token using `SecureStore` or any other encrypted storage
// In the example, we'll use a dummy token
dispatch({ type: 'SIGN_IN', token: 'dummy-auth-token' });
},
}),
[]
);
return (
{state.isLoading ? (
// We haven't finished checking for the token yet
) : state.userToken == null ? (
// No token found, user isn't signed in
) : (
// User is signed in
)}
);
}
// codeblock-focus-end
```
## Fill in other components
We won't talk about how to implement the text inputs and buttons for the authentication screen, that is outside of the scope of navigation. We'll just fill in some placeholder content.
```js
function SignInScreen() {
const [username, setUsername] = React.useState('');
const [password, setPassword] = React.useState('');
const { signIn } = React.useContext(AuthContext);
return (
);
}
```
You can similarly fill in the other screens according to your requirements.
## Removing shared screens when auth state changes
Consider the following example:
**Static:**
```js
const RootStack = createNativeStackNavigator({
groups: {
LoggedIn: {
if: useIsSignedIn,
screens: {
Home: HomeScreen,
Profile: ProfileScreen,
},
},
LoggedOut: {
if: useIsSignedOut,
screens: {
SignIn: SignInScreen,
SignUp: SignUpScreen,
},
},
},
screens: {
Help: HelpScreen,
},
});
```
**Dynamic:**
```js
isSignedIn ? (
<>
) : (
<>
);
```
Here we have specific screens such as `SignIn`, `Home` etc. which are only shown depending on the sign in state. But we also have the `Help` screen which can be shown regardless of the login status. This also means that if the sign in state changes when the user is in the `Help` screen, they'll stay on the `Help` screen.
This can be a problem, we probably want the user to be taken to the `SignIn` screen or `Home` screen instead of keeping them on the `Help` screen.
**Static:**
To make this work, we can move the `Help` screen to both of the groups instead of keeping it outside. This will ensure that the [`navigationKey`](screen.md#navigation-key) (the name of the group) for the screen changes when the sign in state changes.
So our updated code will look like the following:
```js
const RootStack = createNativeStackNavigator({
groups: {
LoggedIn: {
if: useIsSignedIn,
screens: {
Home: HomeScreen,
Profile: ProfileScreen,
Help: HelpScreen,
},
},
LoggedOut: {
if: useIsSignedOut,
screens: {
SignIn: SignInScreen,
SignUp: SignUpScreen,
Help: HelpScreen,
},
},
},
});
```
**Dynamic:**
To make this work, we can use [`navigationKey`](screen.md#navigation-key). When the `navigationKey` changes, React Navigation will remove all the screen.
So our updated code will look like the following:
```js
<>
{isSignedIn ? (
<>
) : (
<>
)}
```
If you have a bunch of shared screens, you can also use [`navigationKey` with a `Group`](group.md#navigation-key) to remove all of the screens in the group. For example:
```js
<>
{isSignedIn ? (
<>
) : (
<>
)}
```
The examples above show stack navigator, but you can use the same approach with any navigator.
By specifying a condition for our screens, we can implement auth flow in a simple way that doesn't require additional logic to make sure that the correct screen is shown.
## Don't manually navigate when conditionally rendering screens
It's important to note that when using such a setup, you **don't manually navigate** to the `Home` screen by calling `navigation.navigate('Home')` or any other method. **React Navigation will automatically navigate to the correct screen** when `isSignedIn` changes - `Home` screen when `isSignedIn` becomes `true`, and to `SignIn` screen when `isSignedIn` becomes `false`. You'll get an error if you attempt to navigate manually.
## Handling deep links after auth
When using deep links, you may want to handle the case where the user opens a deep link that requires authentication.
Example scenario:
- User opens a deep link to `myapp://profile` but is not signed in.
- The app shows the `SignIn` screen.
- After the user signs in, you want to navigate them to the `Profile` screen.
To achieve this, you can set [`UNSTABLE_routeNamesChangeBehavior`](navigator.md#route-names-change-behavior) to `"lastUnhandled"`:
> **Warning:**
>
> This API is experimental and may change in a minor release.
**Static:**
```js
const RootStack = createNativeStackNavigator({
// highlight-next-line
UNSTABLE_routeNamesChangeBehavior: 'lastUnhandled',
screens: {
Home: {
if: useIsSignedIn,
screen: HomeScreen,
},
SignIn: {
if: useIsSignedOut,
screen: SignInScreen,
options: {
title: 'Sign in',
},
},
},
});
```
**Dynamic:**
```js
{isSignedIn ? (
) : (
)}
```
The `UNSTABLE_routeNamesChangeBehavior` option allows you to control how React Navigation handles navigation when the available screens change because of conditions such as authentication state. When `lastUnhandled` is specified, React Navigation will remember the last screen that couldn't be handled, and after the condition changes, it'll automatically navigate to that screen if it's now available.
---
# Supporting safe areas
Source: https://react-navigation-docs.netlify.app/docs/handling-safe-area.md
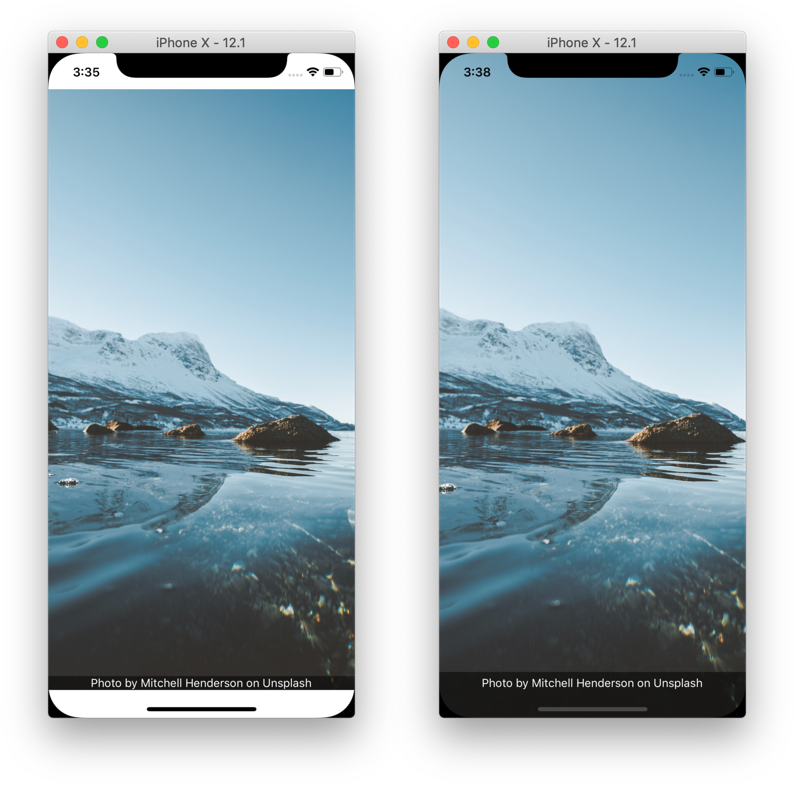
By default, React Navigation tries to ensure that the elements of the navigators display correctly on devices with notches (e.g. iPhone X) and UI elements which may overlap the app content. Such items include:
- Physical notches
- Status bar overlay
- Home activity indicator on iOS
- Navigation bar on Android
The area not overlapped by such items is referred to as "safe area".
We try to apply proper insets on the UI elements of the navigators to avoid being overlapped by such items. The goal is to (a) maximize usage of the screen (b) without hiding content or making it difficult to interact with by having it obscured by a physical display cutout or some operating system UI.
While React Navigation handles safe areas for the built-in UI elements by default, your own content may also need to handle it to ensure that content isn't hidden by these items.
It's tempting to solve (a) by wrapping your entire app in a container with padding that ensures all content will not be occluded. But in doing so, we waste a bunch of space on the screen, as pictured in the image on the left below. What we ideally want is the image pictured on the right.
While React Native exports a `SafeAreaView` component, this component only supports iOS 10+ with no support for older iOS versions or Android. In addition, it also has some issues, i.e. if a screen containing safe area is animating, it causes jumpy behavior. So we recommend to use the `useSafeAreaInsets` hook from the [react-native-safe-area-context](https://github.com/th3rdwave/react-native-safe-area-context) library to handle safe areas in a more reliable way.
> **Warning:**
>
> The `react-native-safe-area-context` library also exports a `SafeAreaView` component. While it works on Android, it also has the same issues with jumpy behavior on vertical animations. In addition, the `SafeAreaView` component and `useSafeAreaInsets` hook can update at different times, resulting in flickering when using them together. So we recommend always using the `useSafeAreaInsets` hook instead and avoid using the `SafeAreaView` component for consistent behavior.
The rest of this guide gives more information on how to support safe areas in React Navigation.
## Hidden/Custom Header or Tab Bar
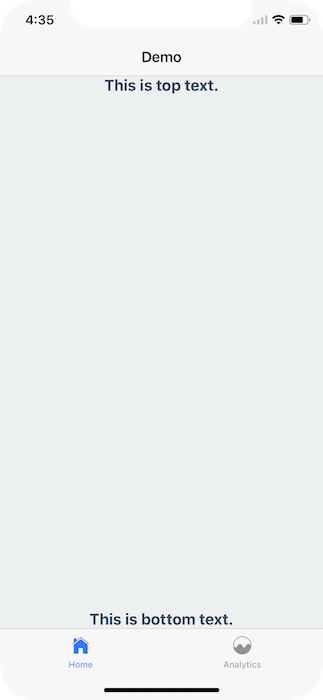
React Navigation handles safe area in the default header. However, if you're using a custom header, it's important to ensure your UI is within the safe area.
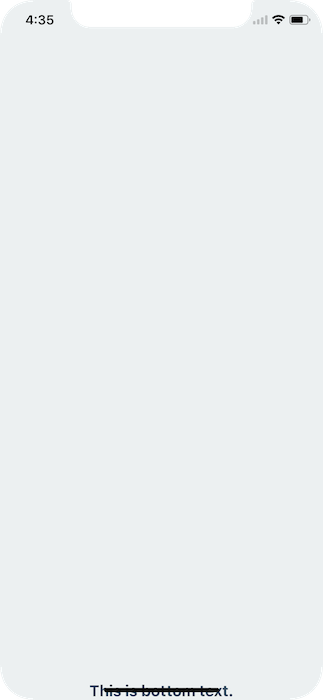
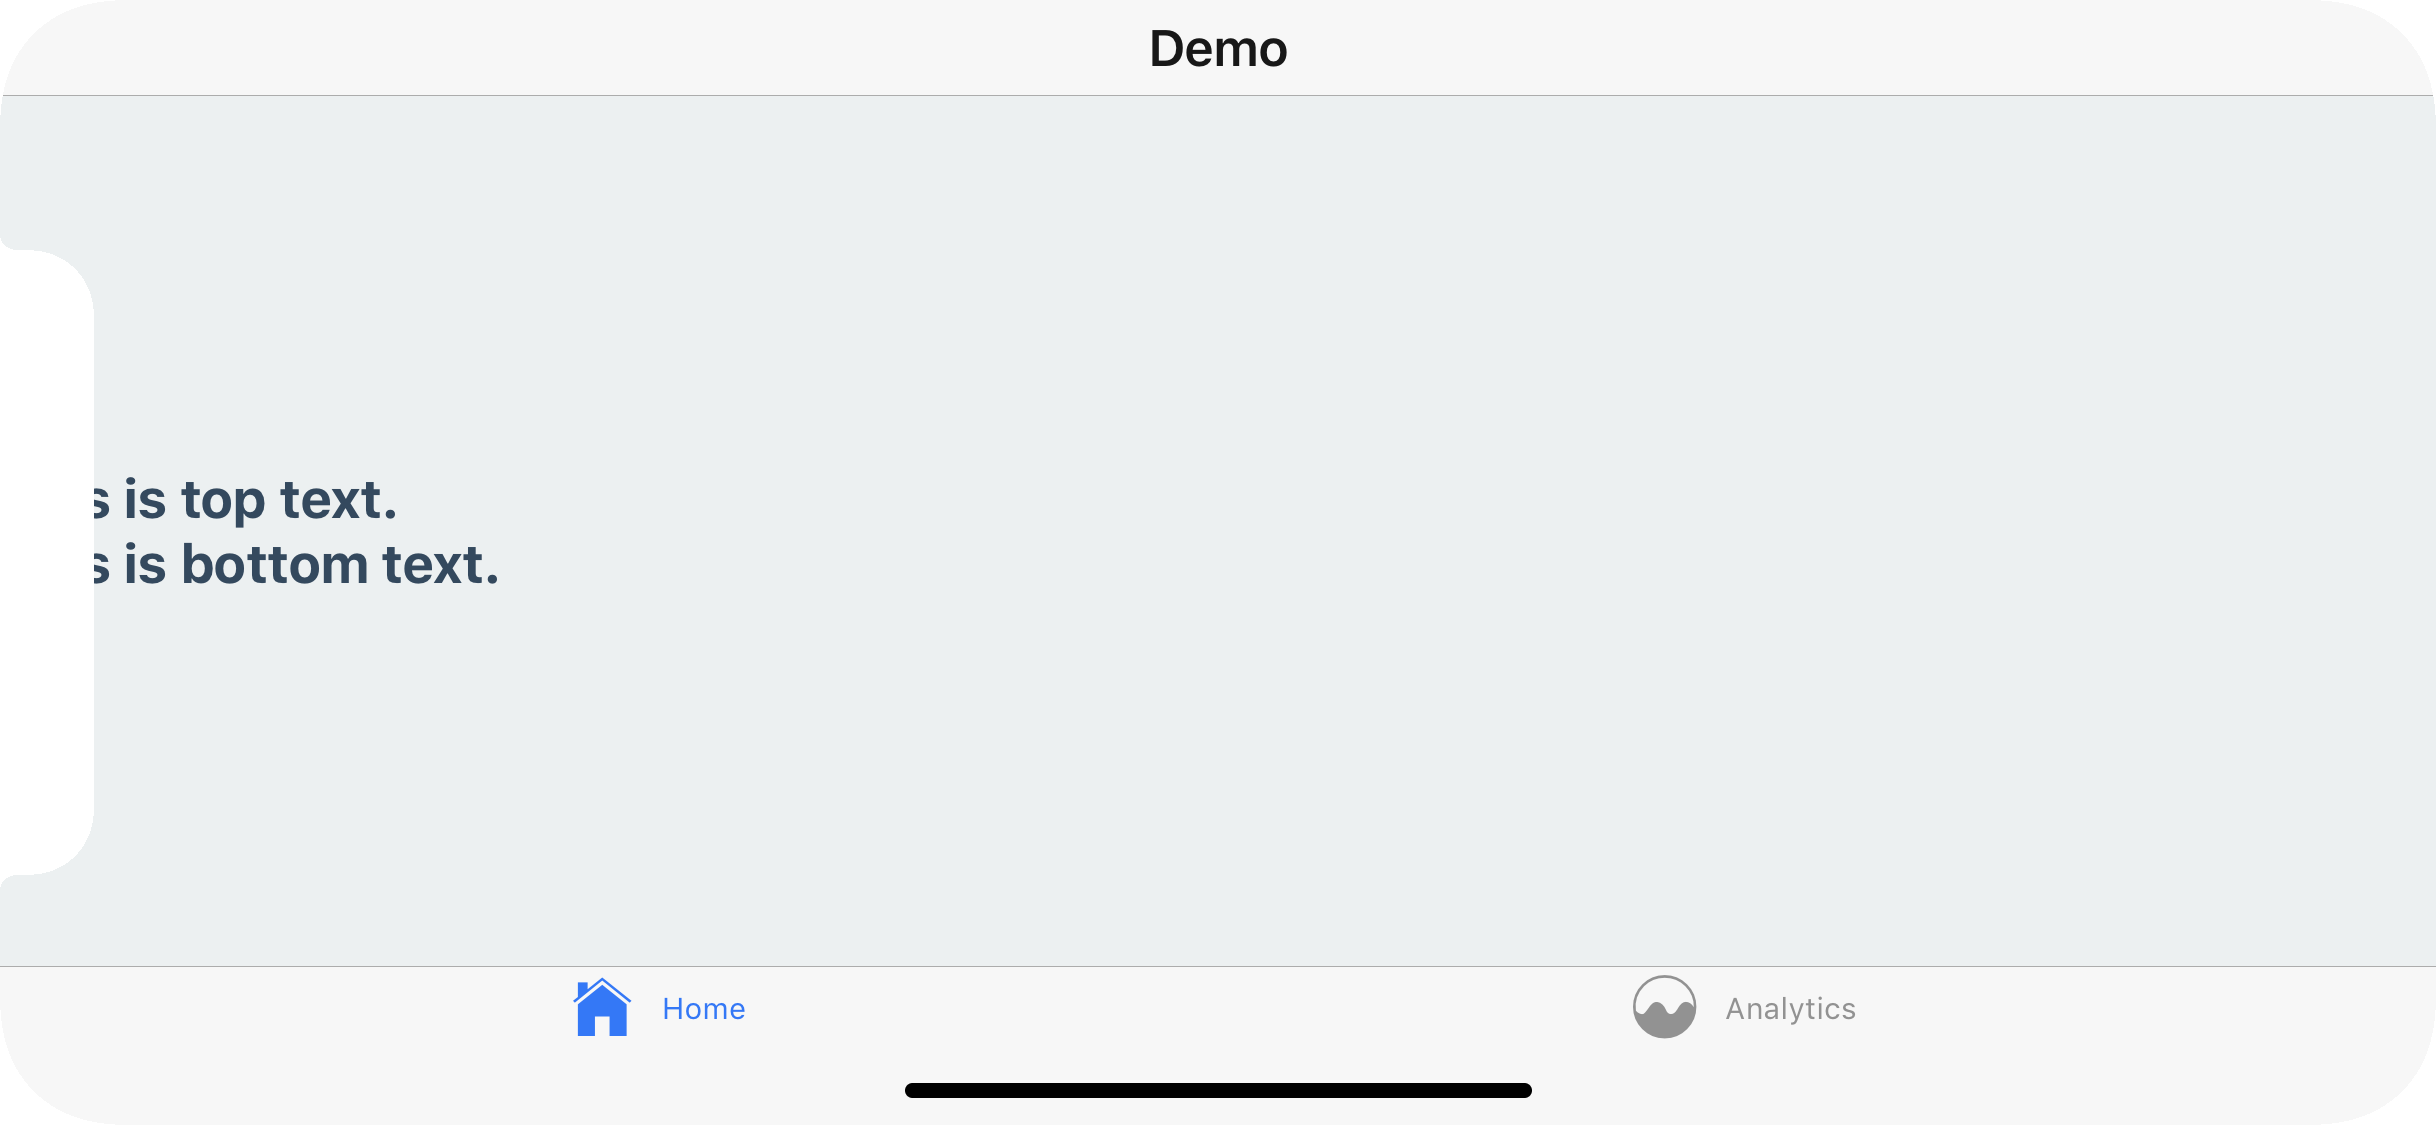
For example, if I render nothing for the `header` or `tabBar`, nothing renders
**Static:**
```js
function Demo() {
return (
This is top text.
This is bottom text.
);
}
// codeblock-focus-start
const MyTabs = createBottomTabNavigator({
initialRouteName: 'Analytics',
// highlight-start
tabBar: () => null,
screenOptions: {
headerShown: false,
},
// highlight-end
screens: {
Analytics: Demo,
Profile: Demo,
},
});
const RootStack = createNativeStackNavigator({
initialRouteName: 'Home',
// highlight-start
screenOptions: {
headerShown: false,
},
// highlight-end
screens: {
Home: MyTabs,
Settings: Demo,
},
});
// codeblock-focus-end
const Navigation = createStaticNavigation(RootStack);
export default function App() {
return ;
}
```
**Dynamic:**
```js
function Demo() {
return (
This is top text.
This is bottom text.
);
}
const Stack = createNativeStackNavigator();
const Tab = createBottomTabNavigator();
export default function App() {
return (
{() => (
null}
screenOptions={{ headerShown: false }}
>
)}
);
}
```
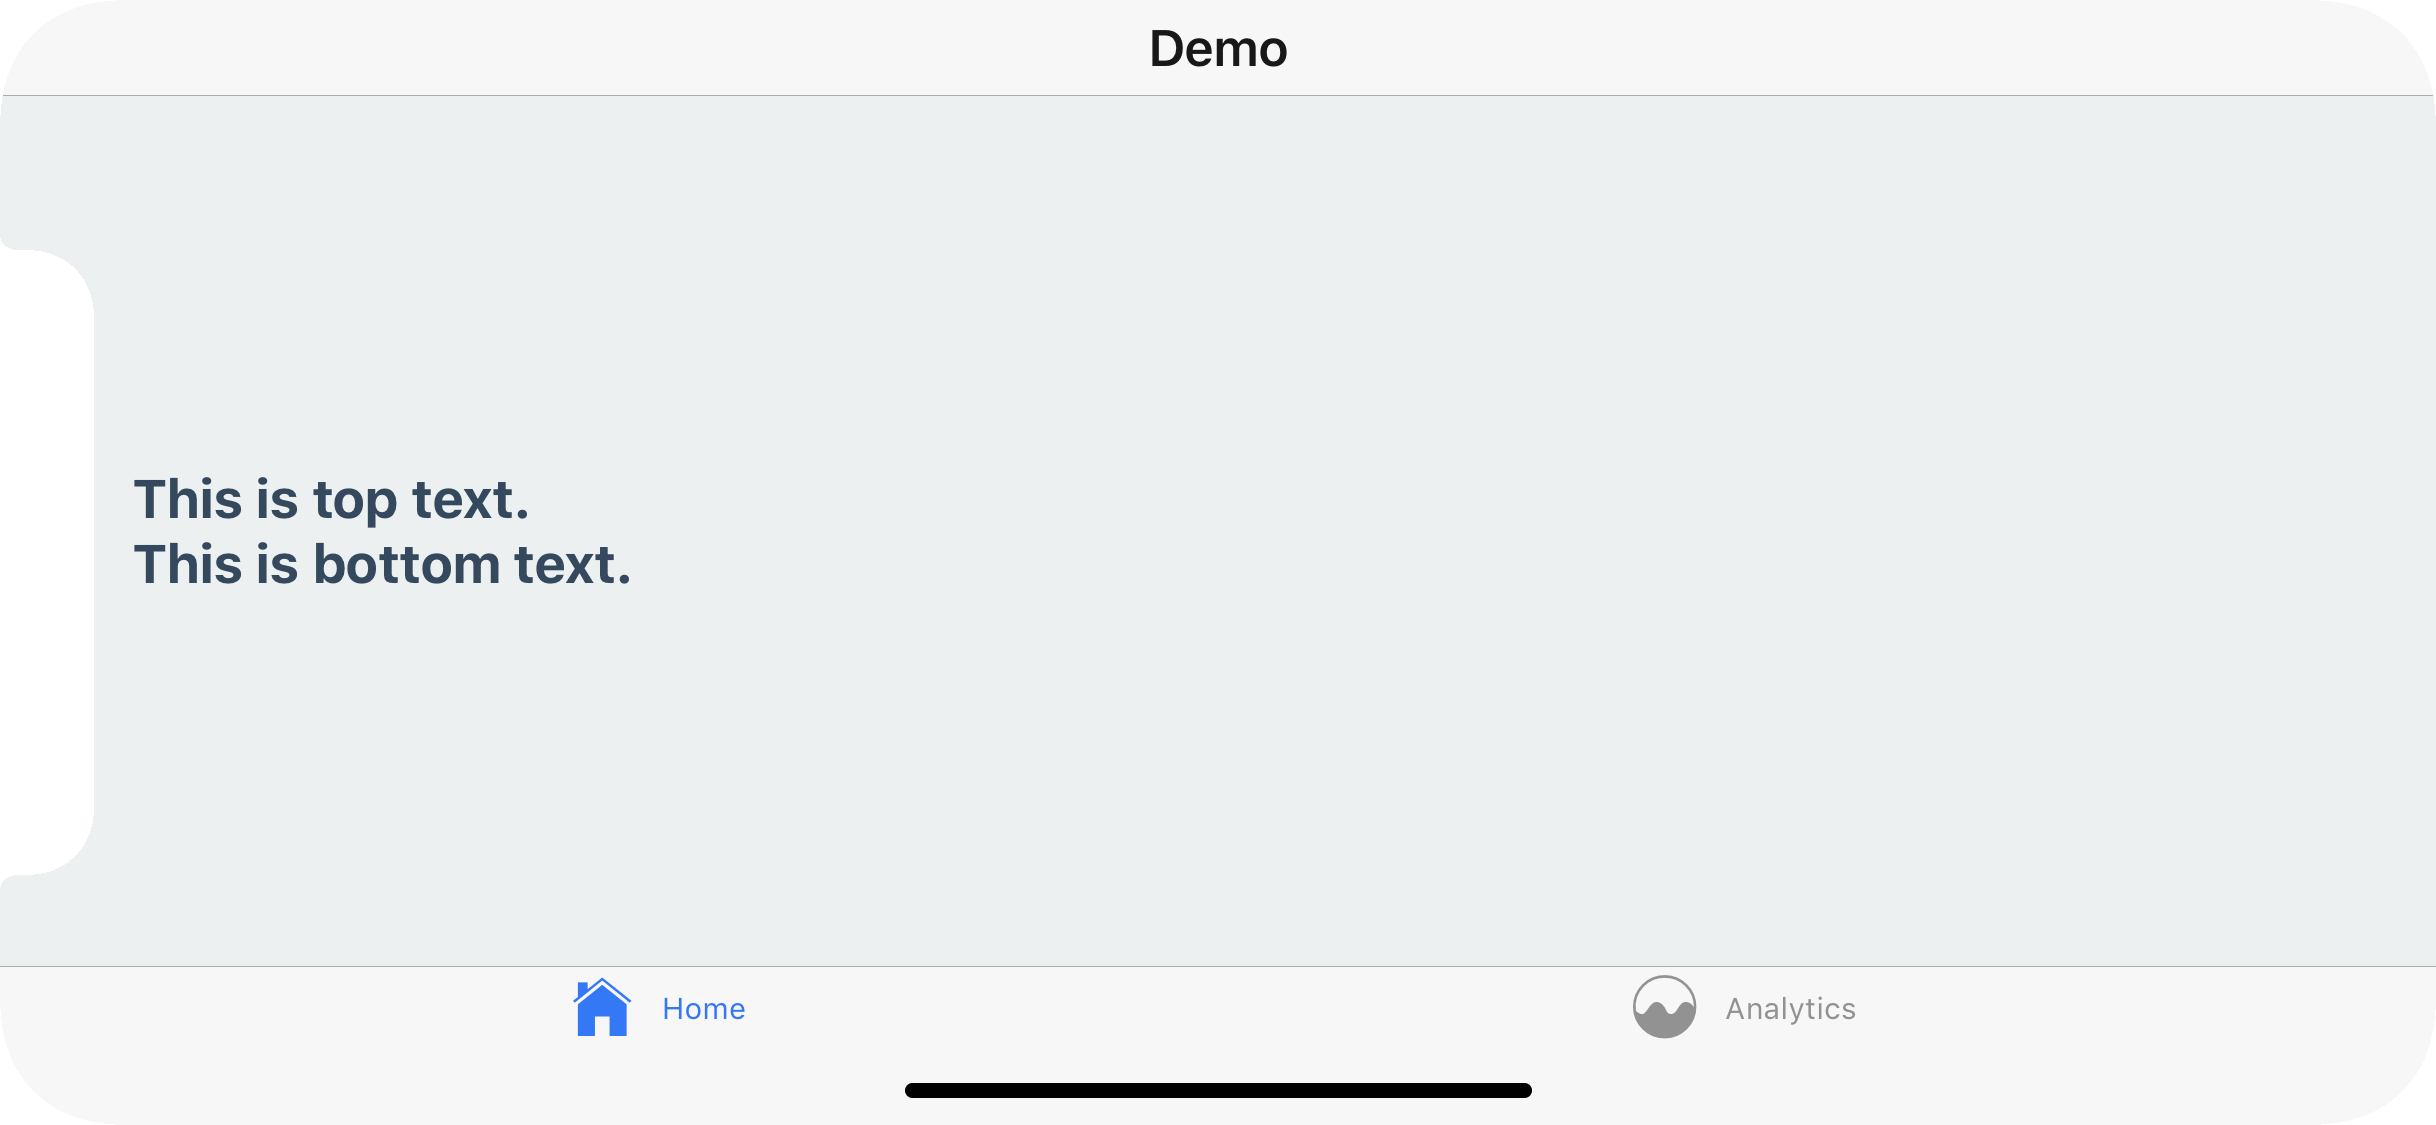
To fix this issue you can apply safe area insets on your content. This can be achieved using the `useSafeAreaInsets` hook from the `react-native-safe-area-context` library:
**Static:**
```js
// codeblock-focus-start
function Demo() {
const insets = useSafeAreaInsets();
return (
This is top text.
This is bottom text.
);
}
// codeblock-focus-end
const MyTabs = createBottomTabNavigator({
initialRouteName: 'Analytics',
tabBar: () => null,
screenOptions: {
headerShown: false,
},
screens: {
Analytics: Demo,
Profile: Demo,
},
});
const RootStack = createNativeStackNavigator({
initialRouteName: 'Home',
screenOptions: {
headerShown: false,
},
screens: {
Home: MyTabs,
Settings: Demo,
},
});
// codeblock-focus-start
const Navigation = createStaticNavigation(RootStack);
export default function App() {
return (
);
}
// codeblock-focus-end
```
**Dynamic:**
```js
// codeblock-focus-start
function Demo() {
const insets = useSafeAreaInsets();
return (
This is top text.
This is bottom text.
);
}
// codeblock-focus-end
const Stack = createNativeStackNavigator();
const Tab = createBottomTabNavigator();
// codeblock-focus-start
export default function App() {
return (
{/*(...) */}
// codeblock-focus-end
{() => (
null}
screenOptions={{ headerShown: false }}
>
)}
// codeblock-focus-start
);
}
// codeblock-focus-end
```
Make sure to wrap your app in `SafeAreaProvider` as per the instructions [here](https://github.com/th3rdwave/react-native-safe-area-context#usage).
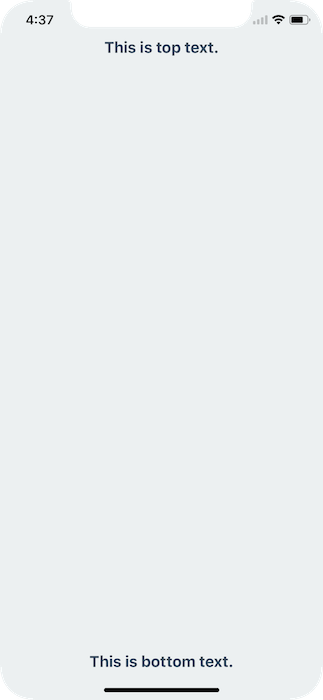
This will detect if the app is running on a device with notches, if so, ensure the content isn't hidden behind any hardware elements.
## Landscape Mode
Even if you're using the default navigation bar and tab bar - if your application works in landscape mode it's important to ensure your content isn't hidden behind the sensor cluster.
To fix this you can, once again, apply safe area insets to your content. This will not conflict with the navigation bar nor the tab bar's default behavior in portrait mode.
## Use the hook for more control
In some cases you might need more control over which paddings are applied. For example, you can only apply the top and the bottom padding by changing the `style` object:
**Static:**
```js
// codeblock-focus-start
function Demo() {
const insets = useSafeAreaInsets();
return (
This is top text.
This is bottom text.
);
}
// codeblock-focus-end
const MyTabs = createBottomTabNavigator({
initialRouteName: 'Analytics',
tabBar: () => null,
screenOptions: {
headerShown: false,
},
screens: {
Analytics: Demo,
Profile: Demo,
},
});
const RootStack = createNativeStackNavigator({
initialRouteName: 'Home',
screenOptions: {
headerShown: false,
},
screens: {
Home: MyTabs,
Settings: Demo,
},
});
// codeblock-focus-start
const Navigation = createStaticNavigation(RootStack);
export default function App() {
return (
);
}
// codeblock-focus-end
```
**Dynamic:**
```js
// codeblock-focus-start
function Demo() {
const insets = useSafeAreaInsets();
return (
This is top text.
This is bottom text.
);
}
// codeblock-focus-end
const Stack = createNativeStackNavigator();
const Tab = createBottomTabNavigator();
export default function App() {
return (
{() => (
null}
screenOptions={{ headerShown: false }}
>
)}
);
}
```
Similarly, you could apply these paddings in `contentContainerStyle` of `FlatList` to have the content avoid the safe areas, but still show them under the statusbar and navigation bar when scrolling.
## Summary
- Use [`useSafeAreaInsets`](https://appandflow.github.io/react-native-safe-area-context/api/use-safe-area-insets) hook from `react-native-safe-area-context` instead of [`SafeAreaView`](https://reactnative.dev/docs/safeareaview) component
- Don't wrap your whole app in `SafeAreaView`, instead apply the styles to content inside your screens
- Apply only specific insets using the `useSafeAreaInsets` hook for more control
---
# Hiding tab bar in specific screens
Source: https://react-navigation-docs.netlify.app/docs/hiding-tabbar-in-screens.md
Sometimes we may want to hide the tab bar in specific screens in a stack navigator nested in a tab navigator. Let's say we have 5 screens: `Home`, `Feed`, `Notifications`, `Profile` and `Settings`, and your navigation structure looks like this:
**Static:**
```js
const HomeStack = createNativeStackNavigator({
screens: {
Home: Home,
Profile: Profile,
Settings: Settings,
},
});
const MyTabs = createBottomTabNavigator({
screens: {
Home: HomeStack,
Feed: Feed,
Notifications: Notifications,
},
});
const Navigation = createStaticNavigation(MyTabs);
export default function App() {
return ;
}
```
**Dynamic:**
```js
function HomeStack() {
return (
);
}
function App() {
return (
);
}
```
With this structure, when we navigate to the `Profile` or `Settings` screen, the tab bar will still stay visible over those screens.
But if we want to show the tab bar only on the `Home`, `Feed` and `Notifications` screens, but not on the `Profile` and `Settings` screens, we'll need to change the navigation structure. The easiest way to achieve this is to nest the tab navigator inside the first screen of the stack instead of nesting stack inside tab navigator:
**Static:**
```js
function EmptyScreen() {
return ;
}
function Home() {
const navigation = useNavigation();
return (
Home Screen
);
}
// codeblock-focus-start
const HomeTabs = createBottomTabNavigator({
screens: {
Home: Home,
Feed: EmptyScreen,
Notifications: EmptyScreen,
},
});
const RootStack = createNativeStackNavigator({
screens: {
Home: HomeTabs,
Profile: EmptyScreen,
Settings: EmptyScreen,
},
});
// codeblock-focus-end
const Navigation = createStaticNavigation(RootStack);
export default function App() {
return ;
}
```
**Dynamic:**
```js
const Tab = createBottomTabNavigator();
const Stack = createNativeStackNavigator();
function EmptyScreen() {
return ;
}
function Home() {
const navigation = useNavigation();
return (
Home Screen
);
}
// codeblock-focus-start
function HomeTabs() {
return (
);
}
function App() {
return (
);
}
// codeblock-focus-end
export default App;
```
After re-organizing the navigation structure, now if we navigate to the `Profile` or `Settings` screens, the tab bar won't be visible over the screen anymore.
---
# Different status bar configuration based on route
Source: https://react-navigation-docs.netlify.app/docs/status-bar.md
If you don't have a navigation header, or your navigation header changes color based on the route, you'll want to ensure that the correct color is used for the content.
## Stack
This is a simple task when using a stack. You can render the `StatusBar` component, which is exposed by React Native, and set your config.
**Static:**
```js
function Screen1() {
const navigation = useNavigation();
const insets = useSafeAreaInsets();
return (
// highlight-start
// highlight-end
Light Screen
);
}
function Screen2() {
const navigation = useNavigation();
const insets = useSafeAreaInsets();
return (
// highlight-start
// highlight-end
Dark Screen
);
}
const RootStack = createNativeStackNavigator({
screenOptions: {
headerShown: false,
},
screens: {
Screen1: Screen1,
Screen2: Screen2,
},
});
const Navigation = createStaticNavigation(RootStack);
export default function App() {
return ;
}
const styles = StyleSheet.create({
container: { flex: 1, justifyContent: 'center', alignItems: 'center' },
});
```
**Dynamic:**
```js
function Screen1() {
const navigation = useNavigation();
const insets = useSafeAreaInsets();
return (
// highlight-start
// highlight-end
Light Screen
);
}
function Screen2() {
const navigation = useNavigation();
const insets = useSafeAreaInsets();
return (
// highlight-start
// highlight-end
Dark Screen
);
}
const Stack = createNativeStackNavigator();
export default function App() {
return (
);
}
const styles = StyleSheet.create({
container: {
flex: 1,
justifyContent: 'center',
alignItems: 'center',
},
});
```
/assets/statusbar/status-stack-ios.mp4
/assets/statusbar/status-stack-android.mp4
## Tabs and Drawer
If you're using a tab or drawer navigator, it's a bit more complex because all of the screens in the navigator might be rendered at once and kept rendered - that means that the last `StatusBar` config you set will be used (likely on the final tab of your tab navigator, not what the user is seeing).
To fix this, we'll have to do make the status bar component aware of screen focus and render it only when the screen is focused. We can achieve this by using the [`useIsFocused` hook](use-is-focused.md) and creating a wrapper component:
```js
function FocusAwareStatusBar(props) {
const isFocused = useIsFocused();
return isFocused ? : null;
}
```
Now, our screens (both `Screen1.js` and `Screen2.js`) will use the `FocusAwareStatusBar` component instead of the `StatusBar` component from React Native:
**Static:**
```js
function FocusAwareStatusBar(props) {
const isFocused = useIsFocused();
return isFocused ? : null;
}
// codeblock-focus-start
function Screen1() {
const navigation = useNavigation();
const insets = useSafeAreaInsets();
return (
Light Screen
);
}
function Screen2() {
const navigation = useNavigation();
const insets = useSafeAreaInsets();
return (
Dark Screen
);
}
// codeblock-focus-end
const RootStack = createNativeStackNavigator({
screenOptions: {
headerShown: false,
},
screens: {
Screen1: Screen1,
Screen2: Screen2,
},
});
const Navigation = createStaticNavigation(RootStack);
export default function App() {
return ;
}
const styles = StyleSheet.create({
container: {
flex: 1,
justifyContent: 'center',
alignItems: 'center',
},
});
```
**Dynamic:**
```js
function FocusAwareStatusBar(props) {
const isFocused = useIsFocused();
return isFocused ? : null;
}
// codeblock-focus-start
function Screen1() {
const navigation = useNavigation();
const insets = useSafeAreaInsets();
return (
Light Screen
);
}
function Screen2() {
const navigation = useNavigation();
const insets = useSafeAreaInsets();
return (
Dark Screen
);
}
// codeblock-focus-end
const Stack = createNativeStackNavigator();
export default function App() {
return (
);
}
const styles = StyleSheet.create({
container: {
flex: 1,
justifyContent: 'center',
alignItems: 'center',
},
});
```
Although not necessary, you can use the `FocusAwareStatusBar` component in the screens of the native stack navigator as well.
/assets/statusbar/status-drawer-ios.mp4
/assets/statusbar/status-drawer-android.mp4
/assets/statusbar/status-tab-ios.mp4
/assets/statusbar/status-tab-android.mp4
---
# Opening a modal
Source: https://react-navigation-docs.netlify.app/docs/modal.md
A modal displays content that temporarily blocks interactions with the main view.
A modal is like a popup — it usually has a different transition animation, and is intended to focus on one particular interaction or piece of content.
## Creating a stack with modal screens
**Static:**
```js
function HomeScreen() {
const navigation = useNavigation();
return (
This is the home screen!
);
}
function ModalScreen() {
const navigation = useNavigation();
return (
This is a modal!
);
}
function DetailsScreen() {
return (
Details
);
}
// codeblock-focus-start
const HomeStack = createStackNavigator({
screens: {
Home: {
screen: HomeScreen,
options: {
headerShown: false,
},
},
Details: {
screen: DetailsScreen,
options: {
headerShown: false,
},
},
},
});
const RootStack = createStackNavigator({
groups: {
Home: {
screens: {
App: {
screen: HomeStack,
options: { title: 'My App' },
},
},
},
// highlight-start
Modal: {
screenOptions: {
presentation: 'modal',
},
screens: {
MyModal: ModalScreen,
},
},
// highlight-end
},
});
const Navigation = createStaticNavigation(RootStack);
export default function App() {
return ;
}
// codeblock-focus-end
```
**Dynamic:**
```js
function HomeScreen() {
const navigation = useNavigation();
return (
This is the home screen!
);
}
function ModalScreen() {
const navigation = useNavigation();
return (
This is a modal!
);
}
function DetailsScreen() {
return (
Details
);
}
// codeblock-focus-start
const Stack = createStackNavigator();
function HomeStack() {
return (
);
}
const StackA = createStackNavigator();
function RootStack() {
return (
);
}
export default function App() {
return (
);
}
// codeblock-focus-end
```
/assets/modal/modal.mp4
Here, we are creating 2 groups of screens. The first group is for our regular screens, and the second group is for our modal screens. For the modal group, we have specified `presentation: 'modal'` in `screenOptions`. This will apply this option to all the screens inside the group. This option will change the animation for the screens to animate from bottom-to-top rather than right to left. The `presentation` option for stack navigator can be either `card` (default), `modal`, or `transparentModal`. The `modal` behavior slides the screen in from the bottom and allows the user to swipe down from the top to dismiss it on iOS.
Instead of specifying this option for a group, it's also possible to specify it for a single screen using the `options` property.
## Summary
- To change the type of transition on a stack navigator you can use the [`presentation`](native-stack-navigator.md#presentation) option.
- When `presentation` is set to `modal`, the screens behave like a modal, i.e. they have a bottom to top transition and may show part of the previous screen in the background.
- Setting `presentation: 'modal'` on a group makes all the screens in the group modals, so to use non-modal transitions on other screens, we add another group with the default configuration.
## Best practices
Since modals are intended to be on top of other content, there are a couple of things to keep in mind when using modals:
- Avoid nesting them inside other navigators like tab or drawer. Modal screens should be defined as part of the root stack.
- Modal screens should be the last in the stack - avoid pushing regular screens on top of modals.
- The first screen in a stack appears as a regular screen even if configured as a modal, since there is no screen before it to show behind. So always make sure that modal screens are pushed on top of a regular screen or another modal screen.
---
# Multiple drawers
Source: https://react-navigation-docs.netlify.app/docs/multiple-drawers.md
Sometimes we want to have multiple drawers on the same screen: one on the left and one on the right. This can be achieved in 2 ways:
1. By using [`react-native-drawer-layout`](drawer-layout.md) directly (Recommended).
2. By [nesting](nesting-navigators.md) 2 [drawer navigators](drawer-navigator.md).
## Using `react-native-drawer-layout`
When we have multiple drawers, only one of them shows the list of screens. The second drawer may often be used to show some additional information such as the list of users etc.
In such cases, we can use [`react-native-drawer-layout`](drawer-layout.md) directly to render the second drawer. The drawer navigator will be used to render the first drawer and can be nested inside the second drawer:
**Static:**
```js
function HomeScreen() {
const navigation = useNavigation();
return (
);
}
const LeftDrawerScreen = createDrawerNavigator({
screenOptions: {
drawerPosition: 'left',
},
screens: {
Home: HomeScreen,
},
});
const Navigation = createStaticNavigation(LeftDrawerScreen);
function RightDrawerScreen() {
const [rightDrawerOpen, setRightDrawerOpen] = React.useState(false);
return (
setRightDrawerOpen(true)}
onClose={() => setRightDrawerOpen(false)}
drawerPosition="right"
renderDrawerContent={() => <>{/* Right drawer content */}}
>
);
}
export default function App() {
return ;
}
```
**Dynamic:**
```js
function HomeScreen() {
const navigation = useNavigation();
return (
);
}
const Drawer = createDrawerNavigator();
function LeftDrawerScreen() {
return (
);
}
function RightDrawerScreen() {
const [rightDrawerOpen, setRightDrawerOpen] = React.useState(false);
return (
setRightDrawerOpen(true)}
onClose={() => setRightDrawerOpen(false)}
drawerPosition="right"
renderDrawerContent={() => <>{/* Right drawer content */}}
>
);
}
export default function App() {
return ;
}
```
But there is one problem. When we call `navigation.openDrawer()` in our `HomeScreen`, it always opens the left drawer. We don't have access to the right drawer via the `navigation` object since it's not a navigator.
To solve this, we need to use context API to pass down a function to control the right drawer:
**Static:**
```js
const RightDrawerContext = React.createContext();
function HomeScreen() {
const { openRightDrawer } = React.useContext(RightDrawerContext);
const navigation = useNavigation();
return (
);
}
const LeftDrawerScreen = createDrawerNavigator({
screenOptions: {
drawerPosition: 'left',
},
screens: {
Home: HomeScreen,
},
});
const Navigation = createStaticNavigation(LeftDrawerScreen);
function RightDrawerScreen() {
const [rightDrawerOpen, setRightDrawerOpen] = React.useState(false);
const value = React.useMemo(
() => ({
openRightDrawer: () => setRightDrawerOpen(true),
closeRightDrawer: () => setRightDrawerOpen(false),
}),
[]
);
return (
setRightDrawerOpen(true)}
onClose={() => setRightDrawerOpen(false)}
drawerPosition="right"
renderDrawerContent={() => <>{/* Right drawer content */}}
>
);
}
export default function App() {
return ;
}
```
**Dynamic:**
```js
const RightDrawerContext = React.createContext();
function HomeScreen() {
const { openRightDrawer } = React.useContext(RightDrawerContext);
const navigation = useNavigation();
return (
);
}
const Drawer = createDrawerNavigator();
function LeftDrawerScreen() {
return (
);
}
function RightDrawerScreen() {
const [rightDrawerOpen, setRightDrawerOpen] = React.useState(false);
const value = React.useMemo(
() => ({
openRightDrawer: () => setRightDrawerOpen(true),
closeRightDrawer: () => setRightDrawerOpen(false),
}),
[]
);
return (
setRightDrawerOpen(true)}
onClose={() => setRightDrawerOpen(false)}
drawerPosition="right"
renderDrawerContent={() => <>{/* Right drawer content */}}
>
);
}
export default function App() {
return ;
}
```
Here, we are using the `RightDrawerContext` to pass down the `openRightDrawer` function to the `HomeScreen`. Then we use `openRightDrawer` to open the right drawer.
## Nesting 2 drawer navigators
An alternative approach is to nest 2 [drawer navigators](drawer-navigator.md) inside each other. This is not recommended since it requires creating an additional screen and more nesting - which can make navigating and type checking more verbose. But this can be useful if both navigators include multiple screens.
Here we have 2 drawer navigators nested inside each other, one is positioned on left and the other on the right:
**Static:**
```js
function HomeScreen() {
const navigation = useNavigation();
return (
);
}
const LeftDrawerScreen = createDrawerNavigator({
screenOptions: {
drawerPosition: 'left',
},
screens: {
Home: HomeScreen,
},
});
const RightDrawerScreen = createDrawerNavigator({
screenOptions: {
drawerPosition: 'right',
headerShown: false,
},
screens: {
HomeDrawer: LeftDrawerScreen,
},
});
const Navigation = createStaticNavigation(RightDrawerScreen);
export default function App() {
return ;
}
```
**Dynamic:**
```js
function HomeScreen() {
const navigation = useNavigation();
return (
);
}
const Drawer = createDrawerNavigator();
function LeftDrawerScreen() {
return (
);
}
const DrawerA = createDrawerNavigator();
function RightDrawerScreen() {
return (
);
}
export default function App() {
return (
);
}
```
/assets/navigators/drawer/drawer-multiple.mp4
But there is one problem. When we call `navigation.openDrawer()` in our `HomeScreen`, it always opens the left drawer since it's the immediate parent of the screen.
To solve this, we need to use [`navigation.getParent`](navigation-object.md#getparent) to refer to the right drawer, which is the parent of the left drawer. So our code would look like:
```js
```
However, this means that our button needs to know about the parent navigators, which isn't ideal. If our button is further nested inside other navigators, it'd need multiple `getParent()` calls. To address this, we can use the [`id` prop](navigator.md#id) to identify the parent navigator.
To customize the contents of the drawer, we can use the [`drawerContent` prop](drawer-navigator.md#drawercontent) to pass in a function that renders a custom component.
The final code would look like this:
**Static:**
```js
function HomeScreen() {
const navigation = useNavigation();
return (
);
}
function RightDrawerContent() {
return (
This is the right drawer
);
}
const LeftDrawerScreen = createDrawerNavigator({
id: 'LeftDrawer',
screenOptions: {
drawerPosition: 'left',
},
screens: {
Home: HomeScreen,
},
});
const RightDrawerScreen = createDrawerNavigator({
id: 'RightDrawer',
drawerContent: (props) => ,
screenOptions: {
drawerPosition: 'right',
headerShown: false,
},
screens: {
HomeDrawer: LeftDrawerScreen,
},
});
const Navigation = createStaticNavigation(RightDrawerScreen);
export default function App() {
return ;
}
```
**Dynamic:**
```js
function HomeScreen() {
const navigation = useNavigation();
return (
);
}
function RightDrawerContent() {
return (
This is the right drawer
);
}
const Drawer = createDrawerNavigator();
function LeftDrawerScreen() {
return (
);
}
const DrawerA = createDrawerNavigator();
function RightDrawerScreen() {
return (
}
screenOptions={{
drawerPosition: 'right',
headerShown: false,
}}
>
);
}
export default function App() {
return (
);
}
```
Here, we are passing `"LeftDrawer"` and `"RightDrawer"` strings (you can use any string here) in the `id` prop of the drawer navigators. Then we use `navigation.getParent('LeftDrawer').openDrawer()` to open the left drawer and `navigation.getParent('RightDrawer').openDrawer()` to open the right drawer.
## Summary
- To have multiple drawers, you can use [`react-native-drawer-layout`](drawer-layout.md) directly in combination with a drawer navigator.
- The [`drawerPosition`](drawer-layout.md#drawerposition) prop can be used to position the drawer on the right.
- The methods to control the drawer can be passed down using context API when using [`react-native-drawer-layout`](drawer-layout.md).
- When nesting multiple navigators, you can use [`navigation.getParent`](navigation-object.md#getparent) in combination with the [`id` prop](navigator.md#id) to refer to the desired drawer.
---
# Screen options with nested navigators
Source: https://react-navigation-docs.netlify.app/docs/screen-options-resolution.md
In this document we'll explain how [screen options](screen-options.md) work when there are multiple navigators. It's important to understand this so that you put your `options` in the correct place and can properly configure your navigators. If you put them in the wrong place, at best nothing will happen and at worst something confusing and unexpected will happen.
**You can only modify navigation options for a navigator from one of its screen components. This applies equally to navigators that are nested as screens.**
Let's take for example a tab navigator that contains a native stack in each tab. What happens if we set the `options` on a screen inside of the stack?
**Static:**
```js
function A() {
return ;
}
function B() {
return ;
}
// codeblock-focus-end
const HomeStackScreen = createNativeStackNavigator({
screens: {
A: {
screen: A,
options: {
tabBarLabel: 'Home',
},
},
},
});
const SettingsStackScreen = createNativeStackNavigator({
screens: {
B: {
screen: B,
options: {
tabBarLabel: 'Settings!',
},
},
},
});
const Tab = createBottomTabNavigator({
screens: {
Home: HomeStackScreen,
Settings: SettingsStackScreen,
},
});
// codeblock-focus-end
const Navigation = createStaticNavigation(Tab);
export default function App() {
return ;
}
```
**Dynamic:**
```js
const Tab = createBottomTabNavigator();
const HomeStack = createNativeStackNavigator();
const SettingsStack = createNativeStackNavigator();
function A() {
return ;
}
function B() {
return ;
}
// codeblock-focus-start
function HomeStackScreen() {
return (
);
}
function SettingsStackScreen() {
return (
);
}
export default function App() {
return (
);
}
// codeblock-focus-end
```
As we mentioned earlier, you can only modify navigation options for a navigator from one of its screen components. `A` and `B` above are screen components in `HomeStack` and `SettingsStack` respectively, not in the tab navigator. So the result will be that the `tabBarLabel` property is not applied to the tab navigator. We can fix this though!
**Static:**
```js
function A() {
return ;
}
function B() {
return ;
}
const HomeStackScreen = createNativeStackNavigator({
screens: {
A: A,
},
});
const SettingsStackScreen = createNativeStackNavigator({
screens: {
B: B,
},
});
// codeblock-focus-start
const Tab = createBottomTabNavigator({
screens: {
Home: {
screen: HomeStackScreen,
options: {
tabBarLabel: 'Home!',
},
},
Settings: {
screen: SettingsStackScreen,
options: {
tabBarLabel: 'Settings!',
},
},
},
});
// codeblock-focus-start
const Navigation = createStaticNavigation(Tab);
export default function App() {
return ;
}
```
**Dynamic:**
```js
const Tab = createBottomTabNavigator();
const HomeStack = createNativeStackNavigator();
const SettingsStack = createNativeStackNavigator();
function A() {
return ;
}
function B() {
return ;
}
function HomeStackScreen() {
return (
);
}
function SettingsStackScreen() {
return (
);
}
// codeblock-focus-start
export default function App() {
return (
);
}
// codeblock-focus-end
```
When we set the `options` directly on `Screen` components containing the `HomeStack` and `SettingsStack` component, it allows us to control the options for its parent navigator when its used as a screen component. In this case, the options on our stack components configure the label in the tab navigator that renders the stacks.
## Setting parent screen options based on child navigator's state
Imagine the following configuration:
**Static:**
```js
function FeedScreen() {
const navigation = useNavigation();
return (
);
}
function ProfileScreen() {
return ;
}
function AccountScreen() {
return ;
}
function SettingsScreen() {
return ;
}
// codeblock-focus-start
const HomeTabs = createBottomTabNavigator({
screens: {
Feed: FeedScreen,
Profile: ProfileScreen,
Account: AccountScreen,
},
});
const RootStack = createNativeStackNavigator({
screens: {
Home: HomeTabs,
Settings: SettingsScreen,
},
});
const Navigation = createStaticNavigation(RootStack);
export default function App() {
return ;
}
// codeblock-focus-end
```
**Dynamic:**
```js
function FeedScreen() {
const navigation = useNavigation();
return (
);
}
function ProfileScreen() {
return ;
}
function AccountScreen() {
return ;
}
function SettingsScreen() {
return ;
}
// codeblock-focus-start
const Tab = createBottomTabNavigator();
function HomeTabs() {
return (
);
}
const Stack = createNativeStackNavigator();
export default function App() {
return (
);
}
// codeblock-focus-end
```
If we were to set the `headerTitle` with `options` for the `FeedScreen`, this would not work. This is because `App` stack will only look at its immediate children for configuration: `HomeTabs` and `SettingsScreen`.
But we can determine the `headerTitle` option based on the [navigation state](navigation-state.md) of our tab navigator using the `getFocusedRouteNameFromRoute` helper. Let's create a function to get the title first:
```js
function getHeaderTitle(route) {
// If the focused route is not found, we need to assume it's the initial screen
// This can happen during if there hasn't been any navigation inside the screen
// In our case, it's "Feed" as that's the first screen inside the navigator
const routeName = getFocusedRouteNameFromRoute(route) ?? 'Feed';
switch (routeName) {
case 'Feed':
return 'News feed';
case 'Profile':
return 'My profile';
case 'Account':
return 'My account';
}
}
```
Then we can use this function with the `options` prop on `Screen`:
**Static:**
```js
function getHeaderTitle(route) {
// If the focused route is not found, we need to assume it's the initial screen
// This can happen during if there hasn't been any navigation inside the screen
// In our case, it's "Feed" as that's the first screen inside the navigator
const routeName = getFocusedRouteNameFromRoute(route) ?? 'Feed';
switch (routeName) {
case 'Feed':
return 'News feed';
case 'Profile':
return 'My profile';
case 'Account':
return 'My account';
}
}
function FeedScreen() {
const navigation = useNavigation();
return (
);
}
function ProfileScreen() {
return ;
}
function AccountScreen() {
return ;
}
function SettingsScreen() {
return ;
}
const HomeTabs = createBottomTabNavigator({
screenOptions: {
headerShown: false,
},
screens: {
Feed: FeedScreen,
Profile: ProfileScreen,
Account: AccountScreen,
},
});
// codeblock-focus-start
const RootStack = createNativeStackNavigator({
screens: {
Home: {
screen: HomeTabs,
options: ({ route }) => ({
headerTitle: getHeaderTitle(route),
}),
},
Settings: SettingsScreen,
},
});
// codeblock-focus-end
const Navigation = createStaticNavigation(RootStack);
export default function App() {
return ;
}
```
**Dynamic:**
```js
function getHeaderTitle(route) {
// If the focused route is not found, we need to assume it's the initial screen
// This can happen during if there hasn't been any navigation inside the screen
// In our case, it's "Feed" as that's the first screen inside the navigator
const routeName = getFocusedRouteNameFromRoute(route) ?? 'Feed';
switch (routeName) {
case 'Feed':
return 'News feed';
case 'Profile':
return 'My profile';
case 'Account':
return 'My account';
}
}
function FeedScreen() {
const navigation = useNavigation();
return (
);
}
function ProfileScreen() {
return ;
}
function AccountScreen() {
return ;
}
function SettingsScreen() {
return ;
}
const Tab = createBottomTabNavigator();
function HomeTabs() {
return (
);
}
const Stack = createNativeStackNavigator();
export default function App() {
return (
// codeblock-focus-start
({
headerTitle: getHeaderTitle(route),
})}
/>
// codeblock-focus-end
);
}
```
So what's happening here? With the `getFocusedRouteNameFromRoute` helper, we can get the currently active route name from this child navigator (in this case it's the tab navigator since that's what we're rendering) and setting an appropriate title for the header.
This approach can be used anytime you want to set options for a parent navigator based on a child navigator's state. Common use cases are:
1. Show tab title in stack header: a stack contains a tab navigator and you want to set the title on the stack header (above example)
2. Show screens without tab bar: a tab navigator contains a stack and you want to hide the tab bar on specific screens (not recommended, see [Hiding tab bar in specific screens](hiding-tabbar-in-screens.md) instead)
3. Lock drawer on certain screens: a drawer has a stack inside of it and you want to lock the drawer on certain screens
In many cases, similar behavior can be achieved by reorganizing our navigators. We usually recommend this option if it fits your use case.
For example, for the above use case, instead of adding a tab navigator inside a stack navigator, we can add a stack navigator inside each of the tabs.
**Static:**
```js
function FeedScreen() {
const navigation = useNavigation();
return (
);
}
function ProfileScreen() {
return ;
}
function SettingsScreen() {
return ;
}
// codeblock-focus-start
const FeedStackScreen = createNativeStackNavigator({
screens: {
Feed: FeedScreen,
/* other screens */
},
});
const ProfileStackScreen = createNativeStackNavigator({
screens: {
Profile: ProfileScreen,
/* other screens */
},
});
const HomeTabs = createBottomTabNavigator({
screens: {
Feed: FeedStackScreen,
Profile: ProfileStackScreen,
},
});
const RootStack = createNativeStackNavigator({
screens: {
Home: HomeTabs,
Settings: SettingsScreen,
},
});
const Navigation = createStaticNavigation(RootStack);
export default function App() {
return ;
}
// codeblock-focus-end
```
**Dynamic:**
```js
function FeedScreen() {
const navigation = useNavigation();
return (
);
}
function ProfileScreen() {
return ;
}
function SettingsScreen() {
return ;
}
const FeedStack = createNativeStackNavigator();
// codeblock-focus-start
function FeedStackScreen() {
return (
{/* other screens */}
);
}
const ProfileStack = createNativeStackNavigator();
function ProfileStackScreen() {
return (
{/* other screens */}
);
}
const Tab = createBottomTabNavigator();
function HomeTabs() {
return (
);
}
const RootStack = createNativeStackNavigator();
export default function App() {
return (
);
}
// codeblock-focus-end
```
Additionally, this lets you push new screens to the feed and profile stacks without hiding the tab bar by adding more routes to those stacks.
If you want to push screens on top of the tab bar (i.e. that don't show the tab bar), then you can add them to the `App` stack instead of adding them into the screens inside the tab navigator.
---
# Custom Android back button behavior
Source: https://react-navigation-docs.netlify.app/docs/custom-android-back-button-handling.md
By default, when user presses the Android hardware back button, react-navigation will pop a screen or exit the app if there are no screens to pop. This is a sensible default behavior, but there are situations when you might want to implement custom handling.
As an example, consider a screen where user is selecting items in a list, and a "selection mode" is active. On a back button press, you would first want the "selection mode" to be deactivated, and the screen should be popped only on the second back button press. The following code snippet demonstrates the situation. We make use of [`BackHandler`](https://reactnative.dev/docs/backhandler.html) which comes with react-native, along with the `useFocusEffect` hook to add our custom `hardwareBackPress` listener.
Returning `true` from `onBackPress` denotes that we have handled the event, and react-navigation's listener will not get called, thus not popping the screen. Returning `false` will cause the event to bubble up and react-navigation's listener will pop the screen.
**Static:**
```js
const listData = [{ key: 'Apple' }, { key: 'Orange' }, { key: 'Carrot' }];
// codeblock-focus-start
function ScreenWithCustomBackBehavior() {
// codeblock-focus-end
const [selected, setSelected] = React.useState(listData[0].key);
const [isSelectionModeEnabled, setIsSelectionModeEnabled] =
React.useState(false);
// codeblock-focus-start
// ...
useFocusEffect(
React.useCallback(() => {
const onBackPress = () => {
if (isSelectionModeEnabled) {
setIsSelectionModeEnabled(false);
return true;
} else {
return false;
}
};
const subscription = BackHandler.addEventListener(
'hardwareBackPress',
onBackPress
);
return () => subscription.remove();
}, [isSelectionModeEnabled])
);
// codeblock-focus-end
return (
{listData.map((item) => (
{isSelectionModeEnabled ? (
{
setSelected(item.key);
}}
style={{
textDecorationLine: item.key === selected ? 'underline' : '',
}}
>
{item.key}
) : (
{item.key === selected ? 'Selected: ' : ''}
{item.key}
)}
))}
Selection mode: {isSelectionModeEnabled ? 'ON' : 'OFF'}
);
// codeblock-focus-start
// ...
}
// codeblock-focus-end
const RootStack = createNativeStackNavigator({
screens: {
CustomScreen: ScreenWithCustomBackBehavior,
},
});
const Navigation = createStaticNavigation(RootStack);
export default function App() {
return ;
}
const styles = StyleSheet.create({
container: {
flex: 1,
alignItems: 'center',
justifyContent: 'center',
},
text: {
fontSize: 20,
marginBottom: 20,
},
});
```
**Dynamic:**
```js
const Stack = createNativeStackNavigator();
const listData = [{ key: 'Apple' }, { key: 'Orange' }, { key: 'Carrot' }];
// codeblock-focus-start
function ScreenWithCustomBackBehavior() {
// codeblock-focus-end
const [selected, setSelected] = React.useState(listData[0].key);
const [isSelectionModeEnabled, setIsSelectionModeEnabled] =
React.useState(false);
// codeblock-focus-start
// ...
useFocusEffect(
React.useCallback(() => {
const onBackPress = () => {
if (isSelectionModeEnabled) {
setIsSelectionModeEnabled(false);
return true;
} else {
return false;
}
};
const subscription = BackHandler.addEventListener(
'hardwareBackPress',
onBackPress
);
return () => subscription.remove();
}, [isSelectionModeEnabled])
);
// codeblock-focus-end
return (
{listData.map((item) => (
{isSelectionModeEnabled ? (
{
setSelected(item.key);
}}
style={{
textDecorationLine: item.key === selected ? 'underline' : '',
}}
>
{item.key}
) : (
{item.key === selected ? 'Selected: ' : ''}
{item.key}
)}
))}
Selection mode: {isSelectionModeEnabled ? 'ON' : 'OFF'}
);
// codeblock-focus-start
// ...
}
// codeblock-focus-end
export default function App() {
return (
);
}
const styles = StyleSheet.create({
container: {
flex: 1,
alignItems: 'center',
justifyContent: 'center',
},
text: {
fontSize: 20,
marginBottom: 20,
},
});
```
The presented approach will work well for screens that are shown in a `StackNavigator`. Custom back button handling in other situations may not be supported at the moment (eg. A known case when this does not work is when you want to handle back button press in an open drawer. PRs for such use cases are welcome!).
If instead of overriding system back button, you'd like to prevent going back from the screen, see docs for [preventing going back](preventing-going-back.md).
## Why not use component lifecycle methods
At first, you may be inclined to use `componentDidMount` to subscribe for the back press event and `componentWillUnmount` to unsubscribe, or use `useEffect` to add the listener. This approach will not work - learn more about this in [navigation lifecycle](navigation-lifecycle.md).
---
# Animating elements between screens
Source: https://react-navigation-docs.netlify.app/docs/shared-element-transitions.md
This guide covers how to animate elements between screens. This feature is known as a [Shared Element Transition](https://docs.swmansion.com/react-native-reanimated/docs/shared-element-transitions/overview/) and it's implemented in the [`@react-navigation/native-stack`](native-stack-navigator.md) with [React Native Reanimated](https://docs.swmansion.com/react-native-reanimated/).
> **Warning:**
>
> Shared Element Transitions are an experimental feature not recommended for production use yet.
>
> **Architecture support:**
>
> - **Reanimated 3** supports Shared Element Transitions on the **Old Architecture** (Paper).
> - **Reanimated 4** supports them on the **New Architecture** (Fabric) since **4.2.0**, but the feature is behind a feature flag. You need to [enable the `ENABLE_SHARED_ELEMENT_TRANSITIONS` feature flag](https://docs.swmansion.com/react-native-reanimated/docs/guides/feature-flags#enable_shared_element_transitions) to use it.
>
> Check [the Reanimated documentation](https://docs.swmansion.com/react-native-reanimated/docs/shared-element-transitions/overview/) for details and [send feedback to the Reanimated team](https://github.com/software-mansion/react-native-reanimated)
/assets/shared-element-transitions/shared-element-transitions.mp4
## Pre-requisites
Before continuing this guide make sure your app meets these criteria:
- You are using [`@react-navigation/native-stack`](native-stack-navigator.md). JS-based [`@react-navigation/stack`](stack-navigator.md) or other navigators are not supported.
- You have [`react-native-reanimated`](https://docs.swmansion.com/react-native-reanimated/docs/fundamentals/getting-started) **v3.0.0 or higher** installed and configured.
- If you are using **Reanimated 4** (New Architecture), you must [enable the `ENABLE_SHARED_ELEMENT_TRANSITIONS` feature flag](https://docs.swmansion.com/react-native-reanimated/docs/guides/feature-flags#enable_shared_element_transitions).
## Minimal example
To create a shared transition:
1. Use `Animated` components imported from `react-native-reanimated`.
2. Assign the same `sharedTransitionTag` to elements on different screens.
3. Navigate between screens. The transition will start automatically.
**Static:**
```js
// codeblock-focus-start
function HomeScreen() {
const navigation = useNavigation();
return (
);
}
function DetailsScreen() {
const navigation = useNavigation();
return (
);
}
// codeblock-focus-end
const RootStack = createNativeStackNavigator({
screens: {
Home: HomeScreen,
Details: DetailsScreen,
},
});
const Navigation = createStaticNavigation(RootStack);
export default function App() {
return ;
}
const styles = StyleSheet.create({
container: {
flex: 1,
alignItems: 'center',
},
});
```
**Dynamic:**
```js
// codeblock-focus-start
function HomeScreen() {
const navigation = useNavigation();
return (
);
}
function DetailsScreen() {
const navigation = useNavigation();
return (
);
}
// codeblock-focus-end
const Stack = createNativeStackNavigator();
function RootStack() {
return (
);
}
export default function App() {
return (
);
}
const styles = StyleSheet.create({
container: {
flex: 1,
alignItems: 'center',
},
});
```
`sharedTransitionTag` is a string that has to be unique in the context of a single screen, but has to match elements between screens. This prop allows Reanimated to identify and animate the elements, similarly to the [`key`](https://react.dev/learn/rendering-lists#keeping-list-items-in-order-with-key) property, which tells React which element in the list is which.
## Customizing the transition
You can customize the transition by passing a custom `SharedTransition` configuration via the `sharedTransitionStyle` prop. Apply the same `sharedTransitionStyle` to the matching element on the target screen.
Custom transition configuration is not fully finalized and might change in a future release.
**New Architecture (Reanimated 4):**
On the New Architecture, the default transition animates `width`, `height`, `originX`, `originY`, `transform`, `backgroundColor`, and `opacity` using `withTiming` with a 500 ms duration.
Currently customization is more limited due to ongoing development. You can't define fully custom animation functions. Instead, use the `SharedTransition` builder class to configure duration and spring-based animations:
```jsx
// Customize duration and use spring animation
// highlight-next-line
const customTransition = SharedTransition.duration(550).springify();
function HomeScreen() {
return (
);
}
```
**Old Architecture (Reanimated 3):**
By default, the transition animates `width`, `height`, `originX`, `originY`, and `transform` using `withTiming` with a 500 ms duration. You can customize the transition using `SharedTransition.custom()`:
```jsx
// highlight-start
const customTransition = SharedTransition.custom((values) => {
'worklet';
return {
height: withSpring(values.targetHeight),
width: withSpring(values.targetWidth),
originX: withSpring(values.targetOriginX),
originY: withSpring(values.targetOriginY),
};
});
// highlight-end
function HomeScreen() {
return (
);
}
```
## Reference
You can find a full Shared Element Transitions reference in the [React Native Reanimated documentation](https://docs.swmansion.com/react-native-reanimated/docs/shared-element-transitions/overview/).
## Limitations
Shared Element Transitions currently have several limitations to be aware of:
- Only the [native stack navigator](native-stack-navigator.md) is supported
- Other navigators such as JS stack, drawer, and bottom tabs are not supported
- Transitions with native modals don't work properly on iOS
### New Architecture specific limitations (Reanimated 4)
The following limitations apply specifically when using Reanimated 4 on the New Architecture:
- The feature must be enabled via the `ENABLE_SHARED_ELEMENT_TRANSITIONS` feature flag
- Custom animation functions are not supported; you can only customize duration and use spring-based animations
- Some properties (e.g., `backgroundColor`) are not supported in progress-based transitions (iOS back gesture)
- There are performance bottlenecks with transforms being recalculated too eagerly
- On iOS, you may encounter issues with vertical positioning due to header height information propagation
The limitations will be addressed in future Reanimated releases.
---
# Preventing going back
Source: https://react-navigation-docs.netlify.app/docs/preventing-going-back.md
Sometimes you may want to prevent the user from leaving a screen to avoid losing unsaved changes. There are a couple of things you may want to do in this case:
## Prevent the user from leaving the screen
The `usePreventRemove` hook allows you to prevent the user from leaving a screen. See the [`usePreventRemove`](use-prevent-remove.md) docs for more details.
Previous approach
Previously, the way to do this was to:
- Override the back button in the header
- Disable back swipe gesture
- Override system back button/gesture on Android
However, using the hook has many important differences in addition to being less code:
- It's not coupled to any specific buttons, going back from custom buttons will trigger it as well
- It's not coupled to any specific actions, any action that removes the route from the state will trigger it
- It works across nested navigators, e.g. if the screen is being removed due to an action in the parent navigator
- The user can still swipe back in the stack navigator, however, the swipe will be canceled if the event is prevented
- It's possible to continue the same action that triggered the event
## Prevent the user from leaving the app
To be able to prompt the user before they leave the app on Android, you can use the `BackHandler` API from React Native:
```js
// ...
React.useEffect(() => {
const onBackPress = () => {
Alert.alert(
'Exit App',
'Do you want to exit?',
[
{
text: 'Cancel',
onPress: () => {
// Do nothing
},
style: 'cancel',
},
{ text: 'YES', onPress: () => BackHandler.exitApp() },
],
{ cancelable: false }
);
return true;
};
const backHandler = BackHandler.addEventListener(
'hardwareBackPress',
onBackPress
);
return () => backHandler.remove();
}, []);
```
On the Web, you can use the `beforeunload` event to prompt the user before they leave the browser tab:
```js
React.useEffect(() => {
const onBeforeUnload = (event) => {
// Prevent the user from leaving the page
event.preventDefault();
event.returnValue = true;
};
window.addEventListener('beforeunload', onBeforeUnload);
return () => {
window.removeEventListener('beforeunload', onBeforeUnload);
};
}, []);
```
> **Warning:**
>
> The user can still close the app by swiping it away from the app switcher or closing the browser tab. Or the app can be closed by the system due to low memory or other reasons. It's also not possible to prevent leaving the app on iOS. We recommend persisting the data and restoring it when the app is opened again instead of prompting the user before they leave the app.
---
# Call a function when focused screen changes
Source: https://react-navigation-docs.netlify.app/docs/function-after-focusing-screen.md
In this guide we will call a function or render something on screen focusing. This is useful for making additional API calls when a user revisits a particular screen in a Tab Navigator, or to track user events as they tap around our app.
There are multiple approaches available to us:
1. Listening to the `'focus'` event with an event listener.
2. Using the `useFocusEffect` hook provided by react-navigation.
3. Using the `useIsFocused` hook provided by react-navigation.
## Triggering an action with a `'focus'` event listener
We can also listen to the `'focus'` event with an event listener. After setting up an event listener, we must also stop listening to the event when the screen is unmounted.
With this approach, we will only be able to call an action when the screen focuses. This is useful for performing an action such as logging the screen view for analytics.
Example:
**Static:**
```js
// codeblock-focus-start
// codeblock-focus-end
// codeblock-focus-start
function ProfileScreen() {
const navigation = useNavigation();
React.useEffect(() => {
const unsubscribe = navigation.addListener('focus', () => {
alert('Screen is focused');
// The screen is focused
// Call any action
});
// Return the function to unsubscribe from the event so it gets removed on unmount
return unsubscribe;
}, [navigation]);
return ;
}
// codeblock-focus-end
function HomeScreen() {
return ;
}
const MyTabs = createBottomTabNavigator({
screens: {
Home: HomeScreen,
Profile: ProfileScreen,
},
});
const Navigation = createStaticNavigation(MyTabs);
export default function App() {
return ;
}
```
**Dynamic:**
```js
// codeblock-focus-start
// codeblock-focus-end
// codeblock-focus-start
function ProfileScreen() {
const navigation = useNavigation();
React.useEffect(() => {
const unsubscribe = navigation.addListener('focus', () => {
alert('Screen is focused');
// The screen is focused
// Call any action
});
// Return the function to unsubscribe from the event so it gets removed on unmount
return unsubscribe;
}, [navigation]);
return ;
}
// codeblock-focus-end
function HomeScreen() {
return ;
}
const Tab = createBottomTabNavigator();
export default function App() {
return (
);
}
```
See the [navigation events guide](navigation-events.md) for more details on the event listener API.
In most cases, it's recommended to use the `useFocusEffect` hook instead of adding the listener manually. See below for details.
## Triggering an action with the `useFocusEffect` hook
React Navigation provides a [hook](use-focus-effect.md) that runs an effect when the screen comes into focus and cleans it up when it goes out of focus. This is useful for cases such as adding event listeners, for fetching data with an API call when a screen becomes focused, or any other action that needs to happen once the screen comes into view.
This is particularly handy when we are trying to stop something when the page is unfocused, like stopping a video or audio file from playing, or stopping the tracking of a user's location.
**Static:**
```js
// codeblock-focus-start
function ProfileScreen() {
useFocusEffect(
React.useCallback(() => {
alert('Screen was focused');
// Do something when the screen is focused
return () => {
alert('Screen was unfocused');
// Do something when the screen is unfocused
// Useful for cleanup functions
};
}, [])
);
return ;
}
// codeblock-focus-end
function HomeScreen() {
return ;
}
const MyTabs = createBottomTabNavigator({
screens: {
Home: HomeScreen,
Profile: ProfileScreen,
},
});
const Navigation = createStaticNavigation(MyTabs);
export default function App() {
return ;
}
```
**Dynamic:**
```js
// codeblock-focus-start
function ProfileScreen() {
useFocusEffect(
React.useCallback(() => {
alert('Screen was focused');
// Do something when the screen is focused
return () => {
alert('Screen was unfocused');
// Do something when the screen is unfocused
// Useful for cleanup functions
};
}, [])
);
return ;
}
// codeblock-focus-end
function HomeScreen() {
return ;
}
const Tab = createBottomTabNavigator();
export default function App() {
return (
);
}
```
See the [`useFocusEffect`](https://reactnavigation.org/docs/use-focus-effect/) documentation for more details.
## Re-rendering screen with the `useIsFocused` hook
React Navigation provides a [hook](use-is-focused.md) that returns a boolean indicating whether the screen is focused or not.
The hook will return `true` when the screen is focused and `false` when our component is no longer focused. This enables us to render something conditionally based on whether the user is on the screen or not.
The `useIsFocused` hook will cause our component to re-render when we focus and unfocus a screen. Using this hook component may introduce unnecessary component re-renders as a screen comes in and out of focus. This could cause issues depending on the type of action we're calling on focusing. Hence we recommend to use this hook only if you need to trigger a re-render. For side-effects such as subscribing to events or fetching data, use the methods described above.
**Static:**
```js
// codeblock-focus-start
function ProfileScreen() {
// codeblock-focus-end
// This hook returns `true` if the screen is focused, `false` otherwise
// codeblock-focus-start
const isFocused = useIsFocused();
return (
{isFocused ? 'focused' : 'unfocused'}
);
}
// codeblock-focus-end
function HomeScreen() {
return ;
}
const MyTabs = createMaterialTopTabNavigator({
screens: {
Home: HomeScreen,
Profile: ProfileScreen,
},
});
const Navigation = createStaticNavigation(MyTabs);
export default function App() {
return ;
}
```
**Dynamic:**
```js
// codeblock-focus-start
function ProfileScreen() {
// codeblock-focus-end
// This hook returns `true` if the screen is focused, `false` otherwise
// codeblock-focus-start
const isFocused = useIsFocused();
return (
{isFocused ? 'focused' : 'unfocused'}
);
}
// codeblock-focus-end
function HomeScreen() {
return ;
}
const Tab = createMaterialTopTabNavigator();
export default function App() {
return (
);
}
```
This example is also documented in the [`useIsFocused` API documentation](use-is-focused.md).
---
# Navigating without the navigation prop
Source: https://react-navigation-docs.netlify.app/docs/navigating-without-navigation-prop.md
Sometimes you need to trigger a navigation action from places where you do not have access to the `navigation` object, such as a Redux middleware. For such cases, you can dispatch navigation actions using a [`ref` on the navigation container](navigation-container.md#ref).
**Do not** use the `ref` if:
- You need to navigate from inside a component without needing to pass the `navigation` prop down, see [`useNavigation`](use-navigation.md) instead. The `ref` behaves differently, and many helper methods specific to screens aren't available.
- You need to handle deep links or universal links. Doing this with the `ref` has many edge cases. See [configuring links](configuring-links.md) for more information on handling deep linking.
- You need to integrate with third party libraries, such as push notifications, branch etc. See [Integrating with other tools](deep-linking.md#integrating-with-other-tools) instead.
**Do** use the `ref` if:
- You use a state management library such as Redux, where you need to dispatch navigation actions from a middleware.
Note that it's usually better to trigger navigation from user actions such as button presses, rather than from a Redux middleware. Navigating on user action makes the app feel more responsive and provides better UX. So consider this before using the `ref` for navigation. The `ref` is an escape hatch for scenarios that can't be handled with the existing APIs and should only be used in rare situations.
## Usage
You can get access to the root navigation object through a `ref` and pass it to the `RootNavigation` which we will later use to navigate.
**Static:**
```js
/* ... */
const Navigation = createStaticNavigation(RootStack);
export default function App() {
return ;
}
```
**Dynamic:**
```js
export default function App() {
return (
{/* ... */}
);
}
```
In the next step, we define `RootNavigation`, which is a simple module with functions that dispatch user-defined navigation actions.
```js
// RootNavigation.js
export const navigationRef = createNavigationContainerRef();
export function navigate(name, params) {
if (navigationRef.isReady()) {
navigationRef.navigate(name, params);
}
}
// add other navigation functions that you need and export them
```
Then, in any of your javascript modules, import the `RootNavigation` and call functions which you exported from it. You may use this approach outside of your React components.
**Static:**
```js
const navigationRef = createNavigationContainerRef();
// codeblock-focus-start
function navigate(name, params) {
if (navigationRef.isReady()) {
navigationRef.navigate(name, params);
}
}
// Example of usage in any of js modules
//import * as RootNavigation from './path/to/RootNavigation.js';
// ...
// RootNavigation.navigate('ChatScreen', { userName: 'Lucy' });
function Home() {
return (
);
}
// codeblock-focus-end
function Settings({ route }) {
return (
Hello {route.params.userName}
);
}
const RootStack = createNativeStackNavigator({
screens: {
Home: Home,
Settings: Settings,
},
});
const Navigation = createStaticNavigation(RootStack);
export default function App() {
return ;
}
```
**Dynamic:**
```js
const navigationRef = createNavigationContainerRef();
// codeblock-focus-start
function navigate(name, params) {
if (navigationRef.isReady()) {
navigationRef.navigate(name, params);
}
}
// Example of usage in any of js modules
//import * as RootNavigation from './path/to/RootNavigation.js';
// ...
// RootNavigation.navigate('ChatScreen', { userName: 'Lucy' });
function Home() {
return (
);
}
// codeblock-focus-end
function Settings({ route }) {
return (
Hello {route.params.userName}
);
}
const RootStack = createNativeStackNavigator();
export default function App() {
return (
);
}
```
Apart from `navigate`, you can add other navigation actions:
```js
// ...
export function push(...args) {
if (navigationRef.isReady()) {
navigationRef.dispatch(StackActions.push(...args));
}
}
```
Note that a stack navigators needs to be rendered to handle this action. You may want to check the [docs for nesting](nesting-navigators.md#navigating-to-a-screen-in-a-nested-navigator) for more details.
When writing tests, you may mock the navigation functions, and make assertions on whether the correct functions are called with the correct parameters.
## Handling initialization
When using this pattern, you need to keep a few things in mind to avoid navigation from failing in your app.
- The `ref` is set only after the navigation container renders, this can be async when handling deep links
- A navigator needs to be rendered to be able to handle actions, the `ref` won't be ready without a navigator
If you try to navigate without rendering a navigator or before the navigator finishes mounting, it will print an error and do nothing. So you'll need to add an additional check to decide what to do until your app mounts.
For an example, consider the following scenario, you have a screen somewhere in the app, and that screen dispatches a redux action on `useEffect`/`componentDidMount`. You are listening for this action in your middleware and try to perform navigation when you get it. This will throw an error, because by this time, the parent navigator hasn't finished mounting and isn't ready. Parent's `useEffect`/`componentDidMount` is always called **after** child's `useEffect`/`componentDidMount`.
To avoid this, you can use the `isReady()` method available on the ref as shown in the above examples.
**Static:**
```js
// codeblock-focus-start
const navigationRef = createNavigationContainerRef();
function navigate(name, params) {
if (navigationRef.isReady()) {
// Perform navigation if the react navigation is ready to handle actions
navigationRef.navigate(name, params);
} else {
// You can decide what to do if react navigation is not ready
// You can ignore this, or add these actions to a queue you can call later
}
}
// codeblock-focus-end
function Home() {
return (
Home
);
}
function Profile() {
return (
Profile
);
}
const RootStack = createNativeStackNavigator({
screens: {
Home: Home,
Profile: Profile,
},
});
const Navigation = createStaticNavigation(RootStack);
export default function App() {
return ;
}
```
**Dynamic:**
```js
const Stack = createNativeStackNavigator();
// codeblock-focus-start
const navigationRef = createNavigationContainerRef();
function navigate(name, params) {
if (navigationRef.isReady()) {
// Perform navigation if the react navigation is ready to handle actions
navigationRef.navigate(name, params);
} else {
// You can decide what to do if react navigation is not ready
// You can ignore this, or add these actions to a queue you can call later
}
}
// codeblock-focus-end
function Home() {
return (
Home
);
}
function Profile() {
return (
Profile
);
}
export default function App() {
return (
);
}
```
If you're unsure if a navigator is rendered, you can call `navigationRef.getRootState()`, and it'll return a valid state object if any navigators are rendered, otherwise it will return `undefined`.
---
# Server rendering
Source: https://react-navigation-docs.netlify.app/docs/server-rendering.md
This guide will cover how to server render your React Native app using React Native for Web and React Navigation. We'll cover the following cases:
1. Rendering the correct layout depending on the request URL
2. Setting appropriate page metadata based on the focused screen
> **Warning:**
>
> Server rendering support is currently limited. It's not possible to provide a seamless SSR experience due to a lack of APIs such as media queries. In addition, many third-party libraries often don't work well with server rendering.
## Pre-requisites
Before you follow the guide, make sure that your app already renders fine on server. To do that, you will need to ensure the following:
- All of the dependencies that you use are [compiled before publishing](https://github.com/react-native-community/bob) to npm, so that you don't get syntax errors on Node.
- Node is configured to be able to `require` asset files such as images and fonts. You can try [webpack-isomorphic-tools](https://github.com/catamphetamine/webpack-isomorphic-tools) to do that.
- `react-native` is aliased to `react-native-web`. You can do it with [babel-plugin-module-resolver](https://github.com/tleunen/babel-plugin-module-resolver).
## Rendering the app
First, let's take a look at an example of how you'd do [server rendering with React Native Web](http://necolas.github.io/react-native-web/docs/?path=/docs/guides-server-side--page) without involving React Navigation:
```js
const { element, getStyleElement } = AppRegistry.getApplication('App');
const html = ReactDOMServer.renderToString(element);
const css = ReactDOMServer.renderToStaticMarkup(getStyleElement());
const document = `
${css}
${html}
`;
```
Here, `./src/App` is the file where you have `AppRegistry.registerComponent('App', () => App)`.
If you're using React Navigation in your app, this will render the screens rendered by your home page. However, if you have [configured links](configuring-links.md) in your app, you'd want to render the correct screens for the request URL on server so that it matches what'll be rendered on the client.
We can use the [`ServerContainer`](server-container.md) to do that by passing this info in the `location` prop. For example, with Koa, you can create a `URL` object from `ctx.url`:
```js
app.use(async (ctx) => {
const location = new URL(ctx.url, 'https://example.org/');
const { element, getStyleElement } = AppRegistry.getApplication('App');
const html = ReactDOMServer.renderToString(
{element}
);
const css = ReactDOMServer.renderToStaticMarkup(getStyleElement());
const document = `
${css}
${html}
`;
ctx.body = document;
});
```
You may also want to set the correct document title and descriptions for search engines, open graph etc. To do that, you can pass a `ref` to the container which will give you the current screen's options.
```js
app.use(async (ctx) => {
const location = new URL(ctx.url, 'https://example.org/');
const { element, getStyleElement } = AppRegistry.getApplication('App');
const ref = React.createRef();
const html = ReactDOMServer.renderToString(
{element}
);
const css = ReactDOMServer.renderToStaticMarkup(getStyleElement());
const options = ref.current?.getCurrentOptions();
const document = `
${css}
${options?.title ?? 'My App'}
${html}
`;
ctx.body = document;
});
```
Make sure that you have specified a `title` option for your screens:
**Static:**
```js
const Stack = createNativeStackNavigator({
screens: {
Home: {
screen: HomeScreen,
options: {
// highlight-next-line
title: 'My App',
},
},
Profile: {
screen: ProfileScreen,
options: ({ route }) => ({
// highlight-next-line
title: `${route.params.name}'s Profile`,
}),
},
},
});
```
**Dynamic:**
```js
({
// highlight-next-line
title: `${route.params.name}'s Profile`,
})}
/>
```
## Handling 404 or other status codes
When [rendering a screen for an invalid URL](configuring-links.md#handling-unmatched-routes-or-404), we should also return a `404` status code from the server.
First, we need to create a context where we'll attach the status code. To do this, place the following code in a separate file that we will be importing on both the server and client:
```js
const StatusCodeContext = React.createContext();
export default StatusCodeContext;
```
Then, we need to use the context in our `NotFound` screen. Here, we add a `code` property with the value of `404` to signal that the screen was not found:
```js
function NotFound() {
const status = React.useContext(StatusCodeContext);
if (status) {
status.code = 404;
}
return (
Oops! This URL doesn't exist.
);
}
```
You could also attach additional information in this object if you need to.
Next, we need to create a status object to pass in the context on our server. By default, we'll set the `code` to `200`. Then pass the object in `StatusCodeContext.Provider` which should wrap the element with `ServerContainer`:
```js
// Create a status object
const status = { code: 200 };
const html = ReactDOMServer.renderToString(
// Pass the status object via context
{element}
);
// After rendering, get the status code and use it for server's response
ctx.status = status.code;
```
After we render the app with `ReactDOMServer.renderToString`, the `code` property of the `status` object will be updated to be `404` if the `NotFound` screen was rendered.
You can follow a similar approach for other status codes too, for example, `401` for unauthorized etc.
## Summary
- Use the `location` prop on `ServerContainer` to render correct screens based on the incoming request.
- Attach a `ref` to the `ServerContainer` to get options for the current screen.
- Use context to attach more information such as status code.
---
# Screen tracking for analytics
Source: https://react-navigation-docs.netlify.app/docs/screen-tracking.md
To track the currently active screen, we need to:
1. Add a callback to get notified of state changes
2. Get the root navigator state and find the active route name
To get notified of state changes, we can use the `onStateChange` prop on `NavigationContainer`. To get the root navigator state, we can use the `getRootState` method on the container's ref. Please note that `onStateChange` is not called on initial render so you have to set your initial screen separately.
## Example
This example shows how the approach can be adapted to any mobile analytics SDK.
**Static:**
```js
// codeblock-focus-start
// codeblock-focus-end
function Home() {
const navigation = useNavigation();
return (
);
}
function Settings() {
const navigation = useNavigation();
return (
);
}
const RootStack = createNativeStackNavigator({
screens: {
Home: Home,
Settings: Settings,
},
});
const Navigation = createStaticNavigation(RootStack);
// codeblock-focus-start
export default function App() {
const navigationRef = useNavigationContainerRef();
const routeNameRef = React.useRef();
return (
{
routeNameRef.current = navigationRef.current.getCurrentRoute().name;
// Replace the line below to add the tracker from a mobile analytics SDK
await trackScreenView(routeNameRef.current);
}}
onStateChange={async () => {
const previousRouteName = routeNameRef.current;
const currentRouteName = navigationRef.current.getCurrentRoute().name;
if (previousRouteName !== currentRouteName) {
// Replace the line below to add the tracker from a mobile analytics SDK
await trackScreenView(currentRouteName);
}
// Save the current route name for later comparison
routeNameRef.current = currentRouteName;
}}
/>
);
}
// codeblock-focus-end
```
**Dynamic:**
```js
// codeblock-focus-start
// codeblock-focus-end
function Home() {
const navigation = useNavigation();
return (
);
}
function Settings() {
const navigation = useNavigation();
return (
);
}
const Stack = createStackNavigator();
// codeblock-focus-start
export default function App() {
const navigationRef = useNavigationContainerRef();
const routeNameRef = React.useRef();
return (
{
routeNameRef.current = navigationRef.current.getCurrentRoute().name;
// Replace the line below to add the tracker from a mobile analytics SDK
await trackScreenView(routeNameRef.current);
}}
onStateChange={async () => {
const previousRouteName = routeNameRef.current;
const currentRouteName = navigationRef.current.getCurrentRoute().name;
if (previousRouteName !== currentRouteName) {
// Replace the line below to add the tracker from a mobile analytics SDK
await trackScreenView(currentRouteName);
}
// Save the current route name for later comparison
routeNameRef.current = currentRouteName;
}}
>
{/* ... */}
// codeblock-focus-end
// codeblock-focus-start
);
}
// codeblock-focus-end
```
> **Note:**
>
> If you are building a library that wants to provide screen tracking integration with React Navigation, you can accept a [`ref`](navigation-container.md#ref) to the navigation container and use the [`ready`](navigation-container.md#ready) and [`state`](navigation-container.md#state) events instead of `onReady` and `onStateChange` props to keep your logic self-contained.
## Libraries with built-in integration
Here are some popular telemetry and analytics libraries that have built-in integration with React Navigation for screen tracking:
### PostHog
Open source product analytics platform with self-hosted and cloud-hosted options. [Learn more](https://posthog.com/docs/libraries/react-native).
### Embrace
Observability platform for mobile and web, powered by OpenTelemetry. [Learn more](https://embrace.io/docs/react-native/features/navigation/?packages=react-navigation%2Fnative).
### Vexo
Analytics for web and React Native. [Learn more](https://docs.vexo.co/react-native-guide/integration).
### Datadog
Real User Monitoring and error tracking platform. [Learn more](https://docs.datadoghq.com/real_user_monitoring/application_monitoring/react_native/integrated_libraries/).
### Sentry
Application performance monitoring and error tracking platform. [Learn more](https://docs.sentry.io/platforms/react-native/tracing/instrumentation/react-navigation/).
### Segment
Customer data platform that supports React Native. [Learn more](https://www.twilio.com/docs/segment/connections/sources/catalog/libraries/mobile/react-native#automatic-screen-tracking).
### Luciq
Mobile observability and experience platform. [Learn more](https://docs.luciq.ai/docs/react-native-repro-steps#react-navigation).
---
# Static vs Dynamic API
Source: https://react-navigation-docs.netlify.app/docs/static-vs-dynamic.md
React Navigation provides two ways to configure your navigation:
- Static API - object-based configuration with automatic TypeScript types and deep linking
- Dynamic API - component-based dynamic configuration
If you're already familiar with the dynamic API, this guide explains how each concept maps to the static API - whether you're migrating an existing app or just learning the static API.
## Limitations
Since the static API is designed for static configuration, there are some limitations to be aware of:
- The navigation tree must be static - you cannot create the list of screens dynamically. However, you can [conditionally render screens using the `if` property](#conditional-screens).
- React hooks cannot be used in `options`, `listeners` etc. However, [`React.use()`](https://react.dev/reference/react/use) can be used to read context values in `options` callback (though it may produce ESLint warnings since ESLint cannot detect that it runs during render), and you can use the `theme` parameter instead of `useTheme()`.
## Basic usage
In the dynamic API, navigators are React components rendered inside `NavigationContainer`. In the static API, you pass the configuration object to `createXNavigator` and render the component returned by `createStaticNavigation`:
```js title="Dynamic API"
const Stack = createNativeStackNavigator();
function RootStack() {
return (
);
}
function App() {
return (
);
}
```
```js title="Static API"
const RootStack = createNativeStackNavigator({
screens: {
Home: HomeScreen,
},
});
const Navigation = createStaticNavigation(RootStack);
function App() {
return ;
}
```
The component returned by [`createStaticNavigation`](static-configuration.md#createstaticnavigation) accepts the [same props as `NavigationContainer`](navigation-container.md#props).
## Navigation object
Screens no longer receive the `navigation` object as a prop in the static API. It's necessary to use the [`useNavigation`](use-navigation.md) hook instead:
```js title="Dynamic API"
function HomeScreen({ navigation }) {
return (